I am an unapologetic crafter. I have probably a dozen or so projects either in the midst of completion or just floating around my brain…scary. My husband would probably agree. I have a crafting room that is still being put together – the problem is that as I go through my stuff to get more organized, I find new projects and ideas. It’s a sad, vicious cycle.
Recently, I’ve been trying to figure out ways to widen my scope by inviting others to join me, especially from our church. I’m still getting to know the members up here (just started attending when we got married), and crafting is a nice, casual way to hang out and fellowship. The first attempt was a craft I learned from my sister as a little kid. Seriously, I think I was 8 yrs old when she taught me how to make these, and I still have the thought in the back of my mind that it’s a little kid craft, BUT it is definitely something that can be jazzed up and done very creatively. It is also a repurposing craft, which is something I LOVE!
Here we go!
The best kind of paper for paper beading is magazine paper. It is thin, flexible, and general has a lot of color on it. If you’ve ever paid attention to a magazine advertisement or just a story with lots of photographs in it, they will generally have colors that go well together. You want to avoid pages that have a white or black border on any part of the page (unless you want that color dominant for your beads) as whatever color is on the edges is what color your beads will most present. Here’s what you need to get started:
 A magazine page (full page with as clean a tear as you can get), ruler, pencil, eraser, scissors (sharper the better), pencil sharpener (if you’re doing a bunch of pages), round toothpicks, clear-drying craft glue, and quick-dry clear fingernail polish.
Here’s where some forethought is needed. Decide what kind of beads you want. Do you want long rounded ones, or tiny round ones, or tube-like ones, etc. Do you want them small or a little larger? If you want a bunch of small beads, it’s best to make your bead lines along the narrower part of the page. If you want them to be a bit thicker, and not as many, draw your bead lines along the long part of the page. It also matters which colors from the page you dominant. If you want the colors on the sides to be dominant then draw along the narrower part. If you want the colors on the top and bottom, draw on the longer part. Let me show you what I mean:
 Because the page I chose has the gold coloring throughout the whole sheet, it didn’t really matter which direction I drew the lines. But I decided I wanted a lot of smaller beads, so I started spacing my lines with the paper horizontally in front of me. You might see it better in the next pictures. It’s also a good idea to draw your lines on the back of the page so that you don’t have any pencil/eraser marks on your beads themselves. Magazine paper does not do well with erasers, so if you do erase, you might lose some color, so I recommend drawing the lines on the back.
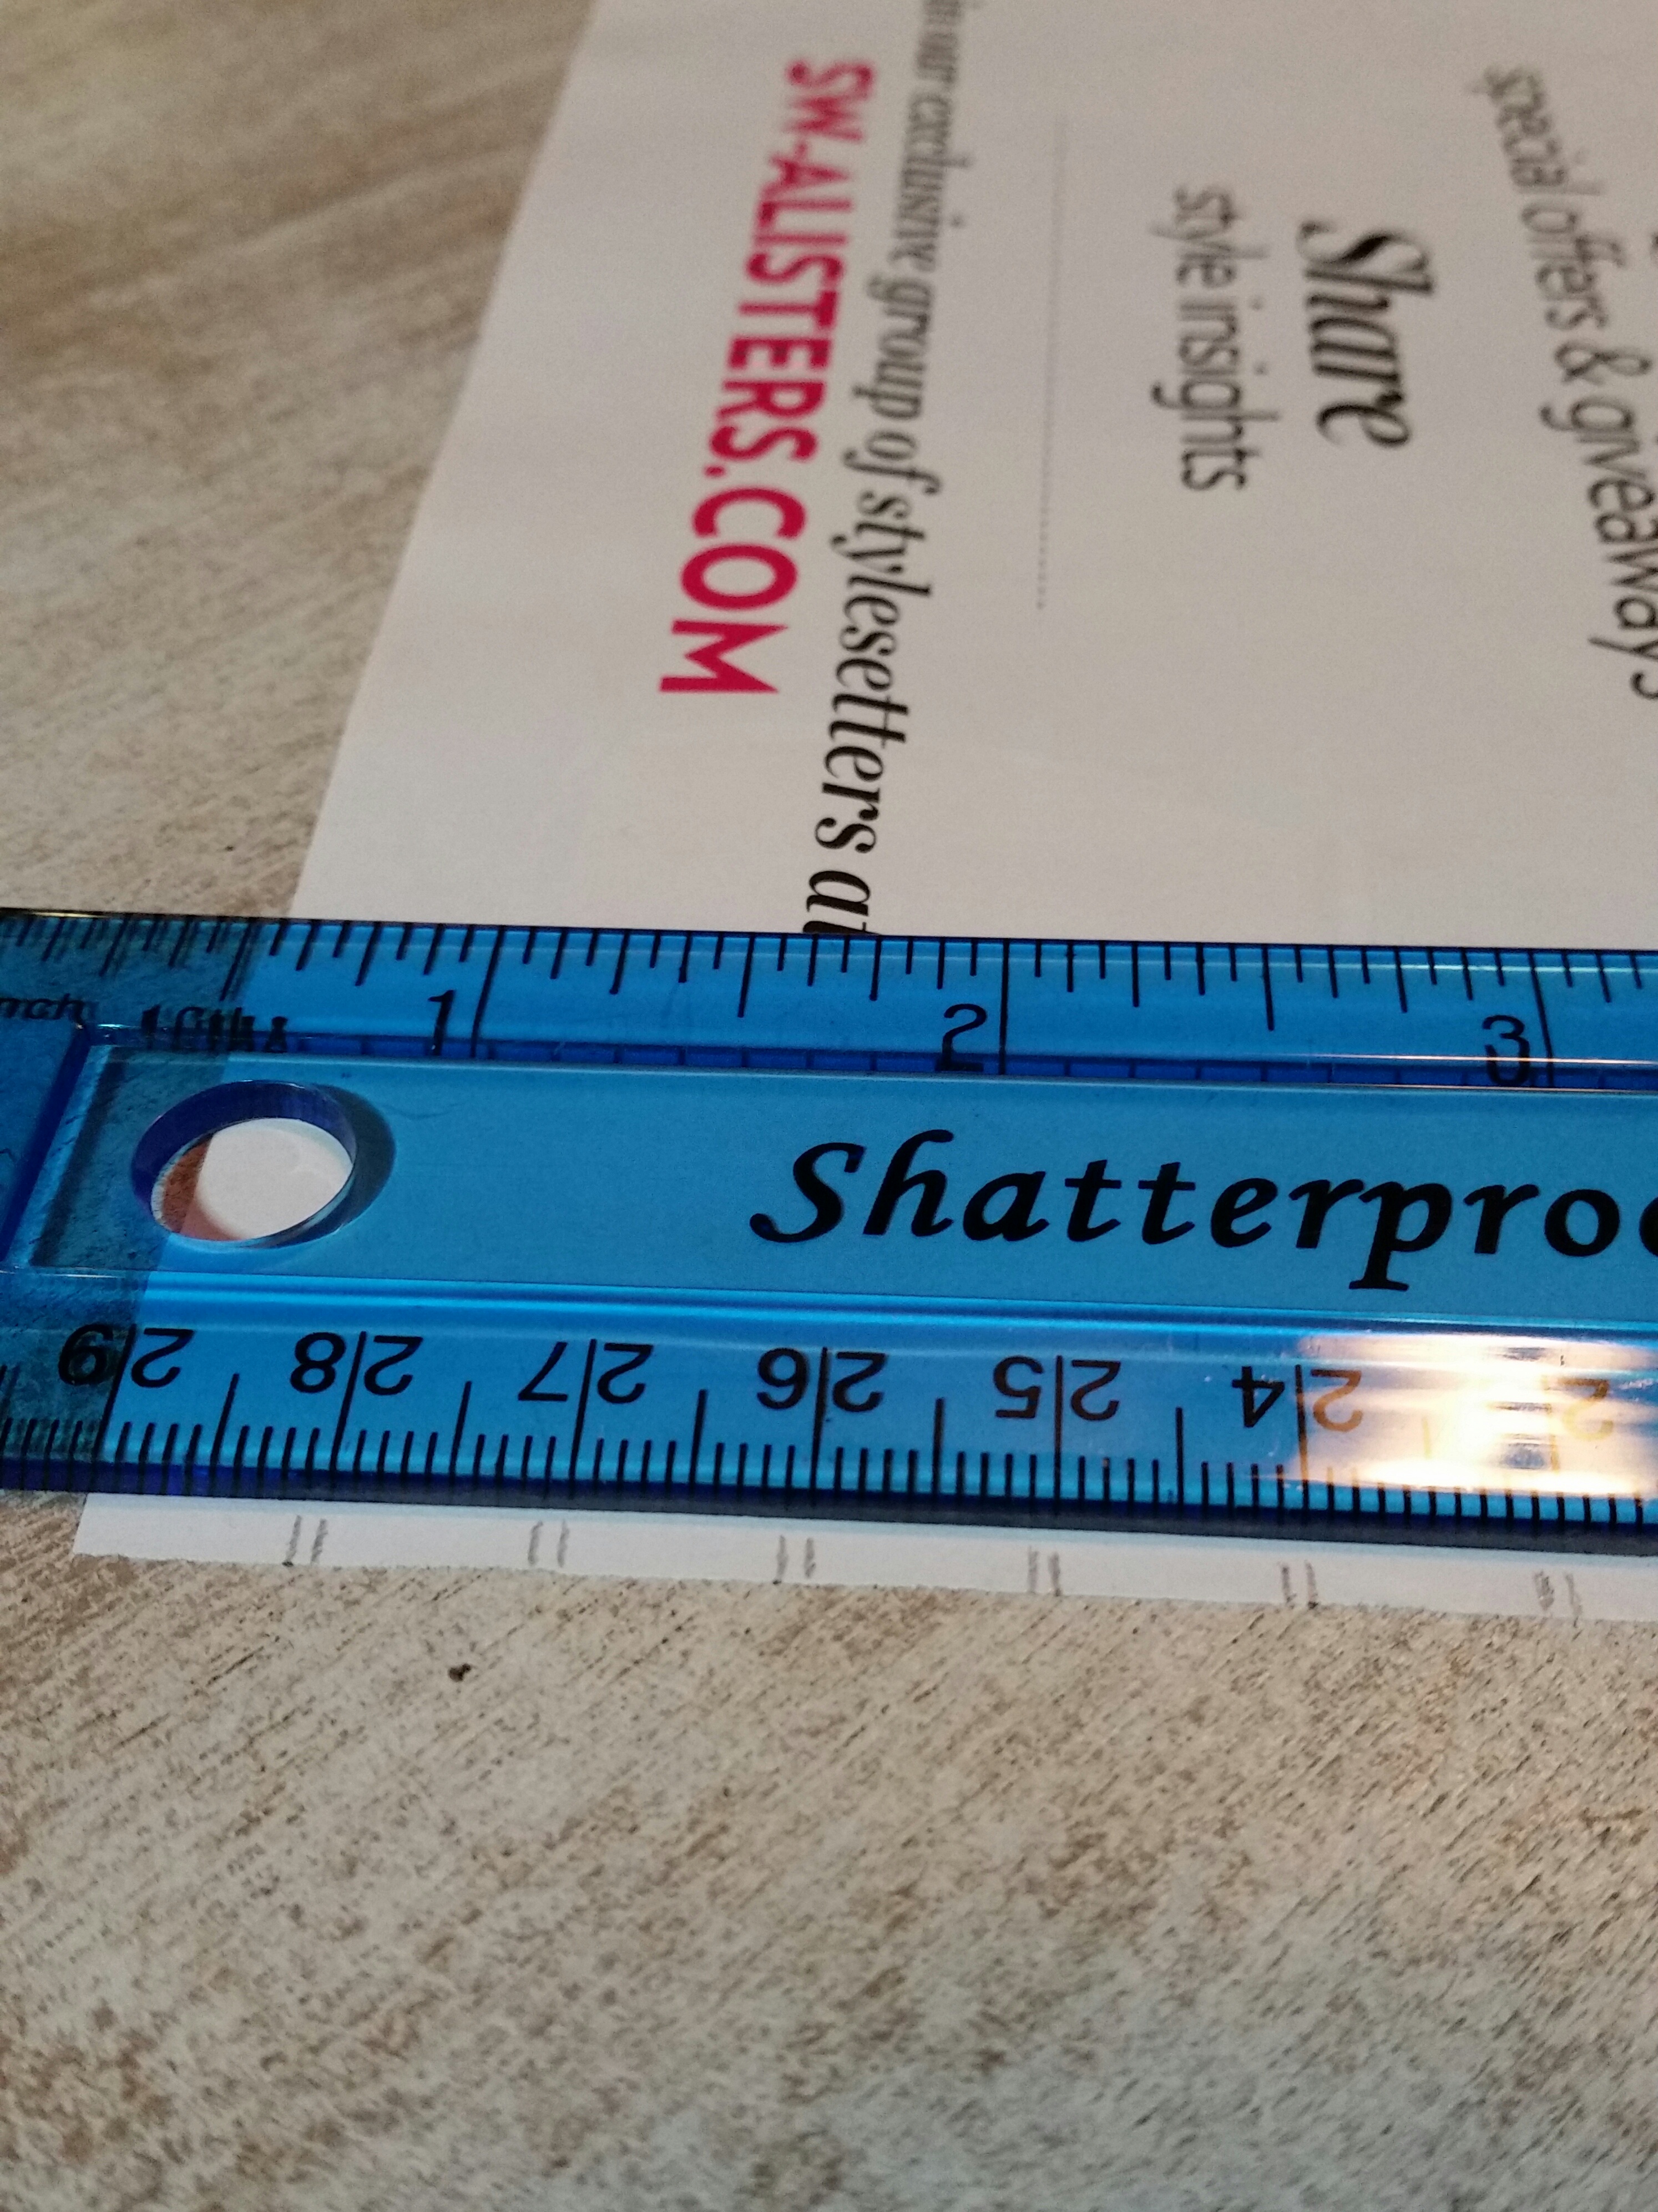
This is the tedious part, but it’s not terrible. Decide how wide you want your beads to be. I like a standard width of one centimeter. Above, I actually made the spacing a little smaller that one centimeter but the idea is the same. You can determine how much color of the page will show through the bead design by how big or small you make the tip (the small spacing above). I wanted a lot of the gold to show on my bead, and for them to be pretty rounded once they are rolled up, so I made my tip as small as possible (one millimeter).
Continue the measuring ticks down the edge of the page until you run out of paper. Flip the paper over and begin on the opposite edge, but the same side as the first time. (For example, if you started from the left side of the page before, when you flip it, begin from the right side.) Measure in halfway one bead size (if you are measuring your beads to be 1 cm wide, measure in from the edging 5 mm) When you find that point, put the small measurement in its place. (if your small end of the bead is 2 mm, you will now have tick marks from the edge at 4 mm and 6 mm). Then continue your original pattern along that side of the page. You are now staggering your tick marks opposite the ones you already made on the other side. This is so that when you connect the tick marks, you will have really long triangles of even spacing, thus using the most of your paper. The next image might make it a little clearer for you.
 I sure hope that helps. Now you have very long triangles that can be rolled into paper beads! Can you see it yet? No? Well, hang in there. Begin to cut along the lines you have drawn, discarding the strips on either end of the page because they will not match the rest of your beads.
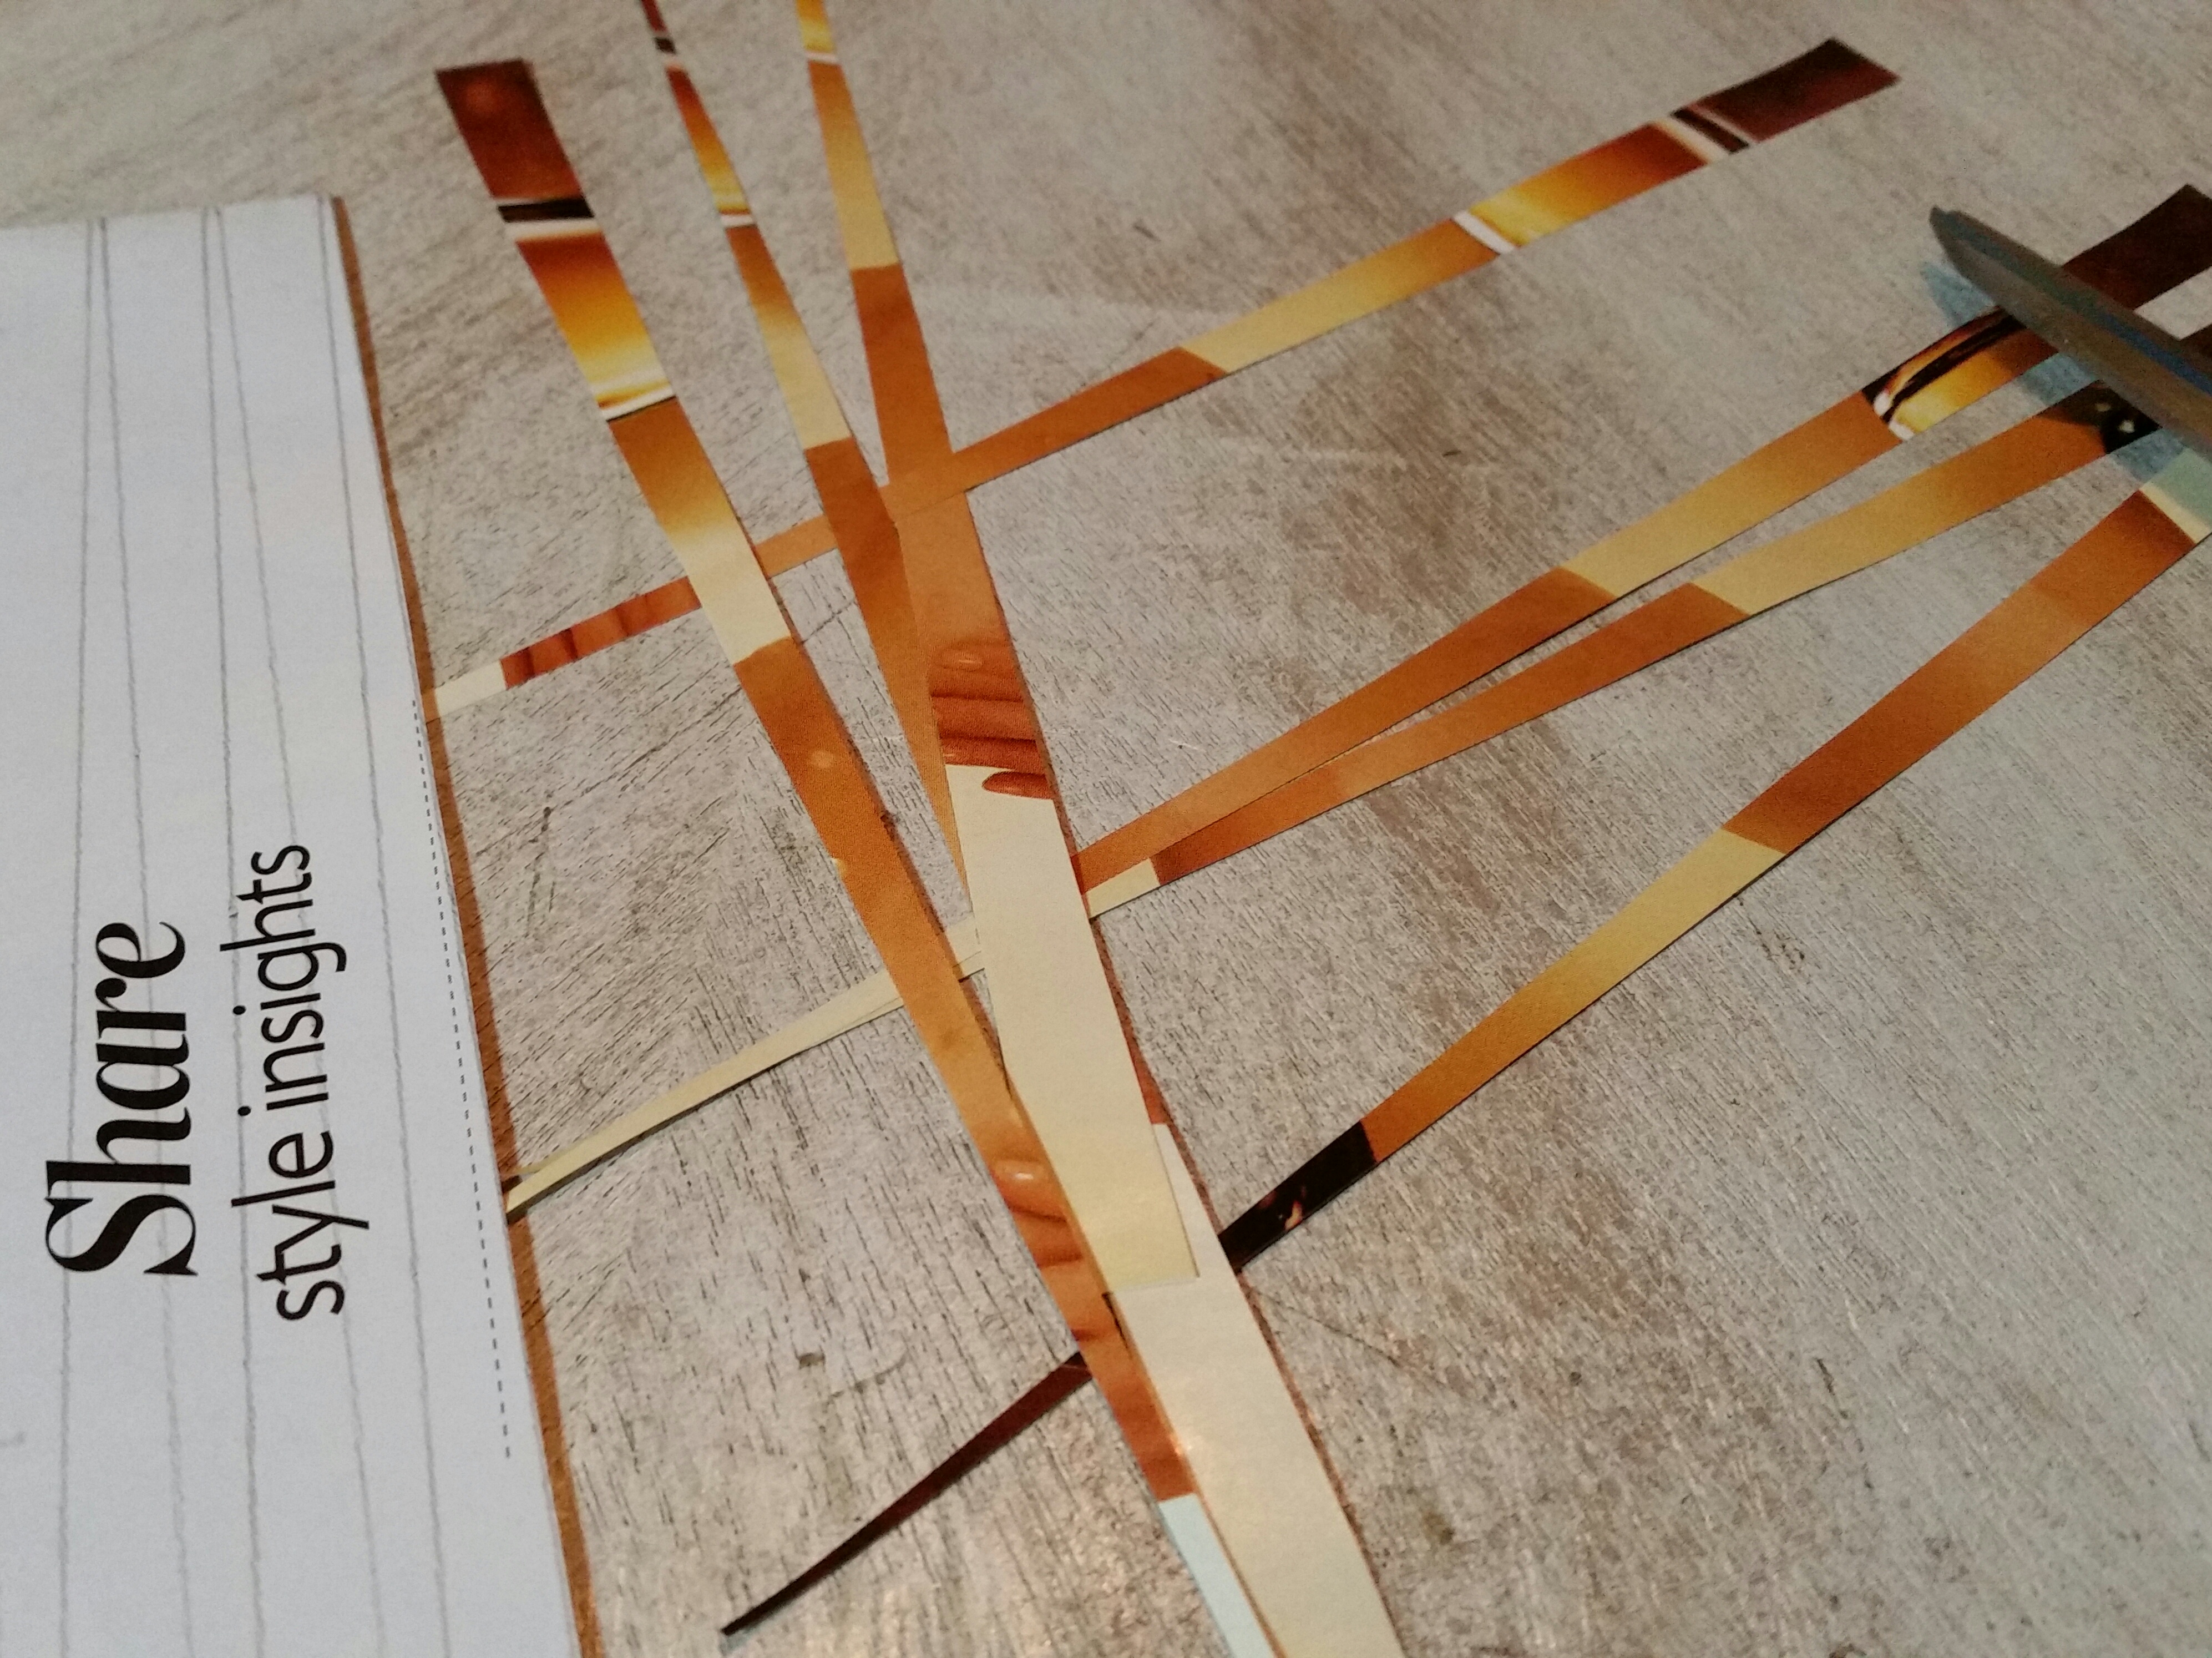 You don’t have to cut on the lines exactly, but do the best you can. The graduated angle of the strips will add depth to your bead, but it is ok for them to be unique. They are YOUR beads, after all. You will notice that the coloring of the strips will alternate depending on which edge of the paper the wide end was sitting. It’s ok if they are different because the colors should already go together well.
 When all the strips are cut, get out your toothpicks. Just a handful is enough to start with. I like to work with about 7 at a time to make a sort of assembly line.
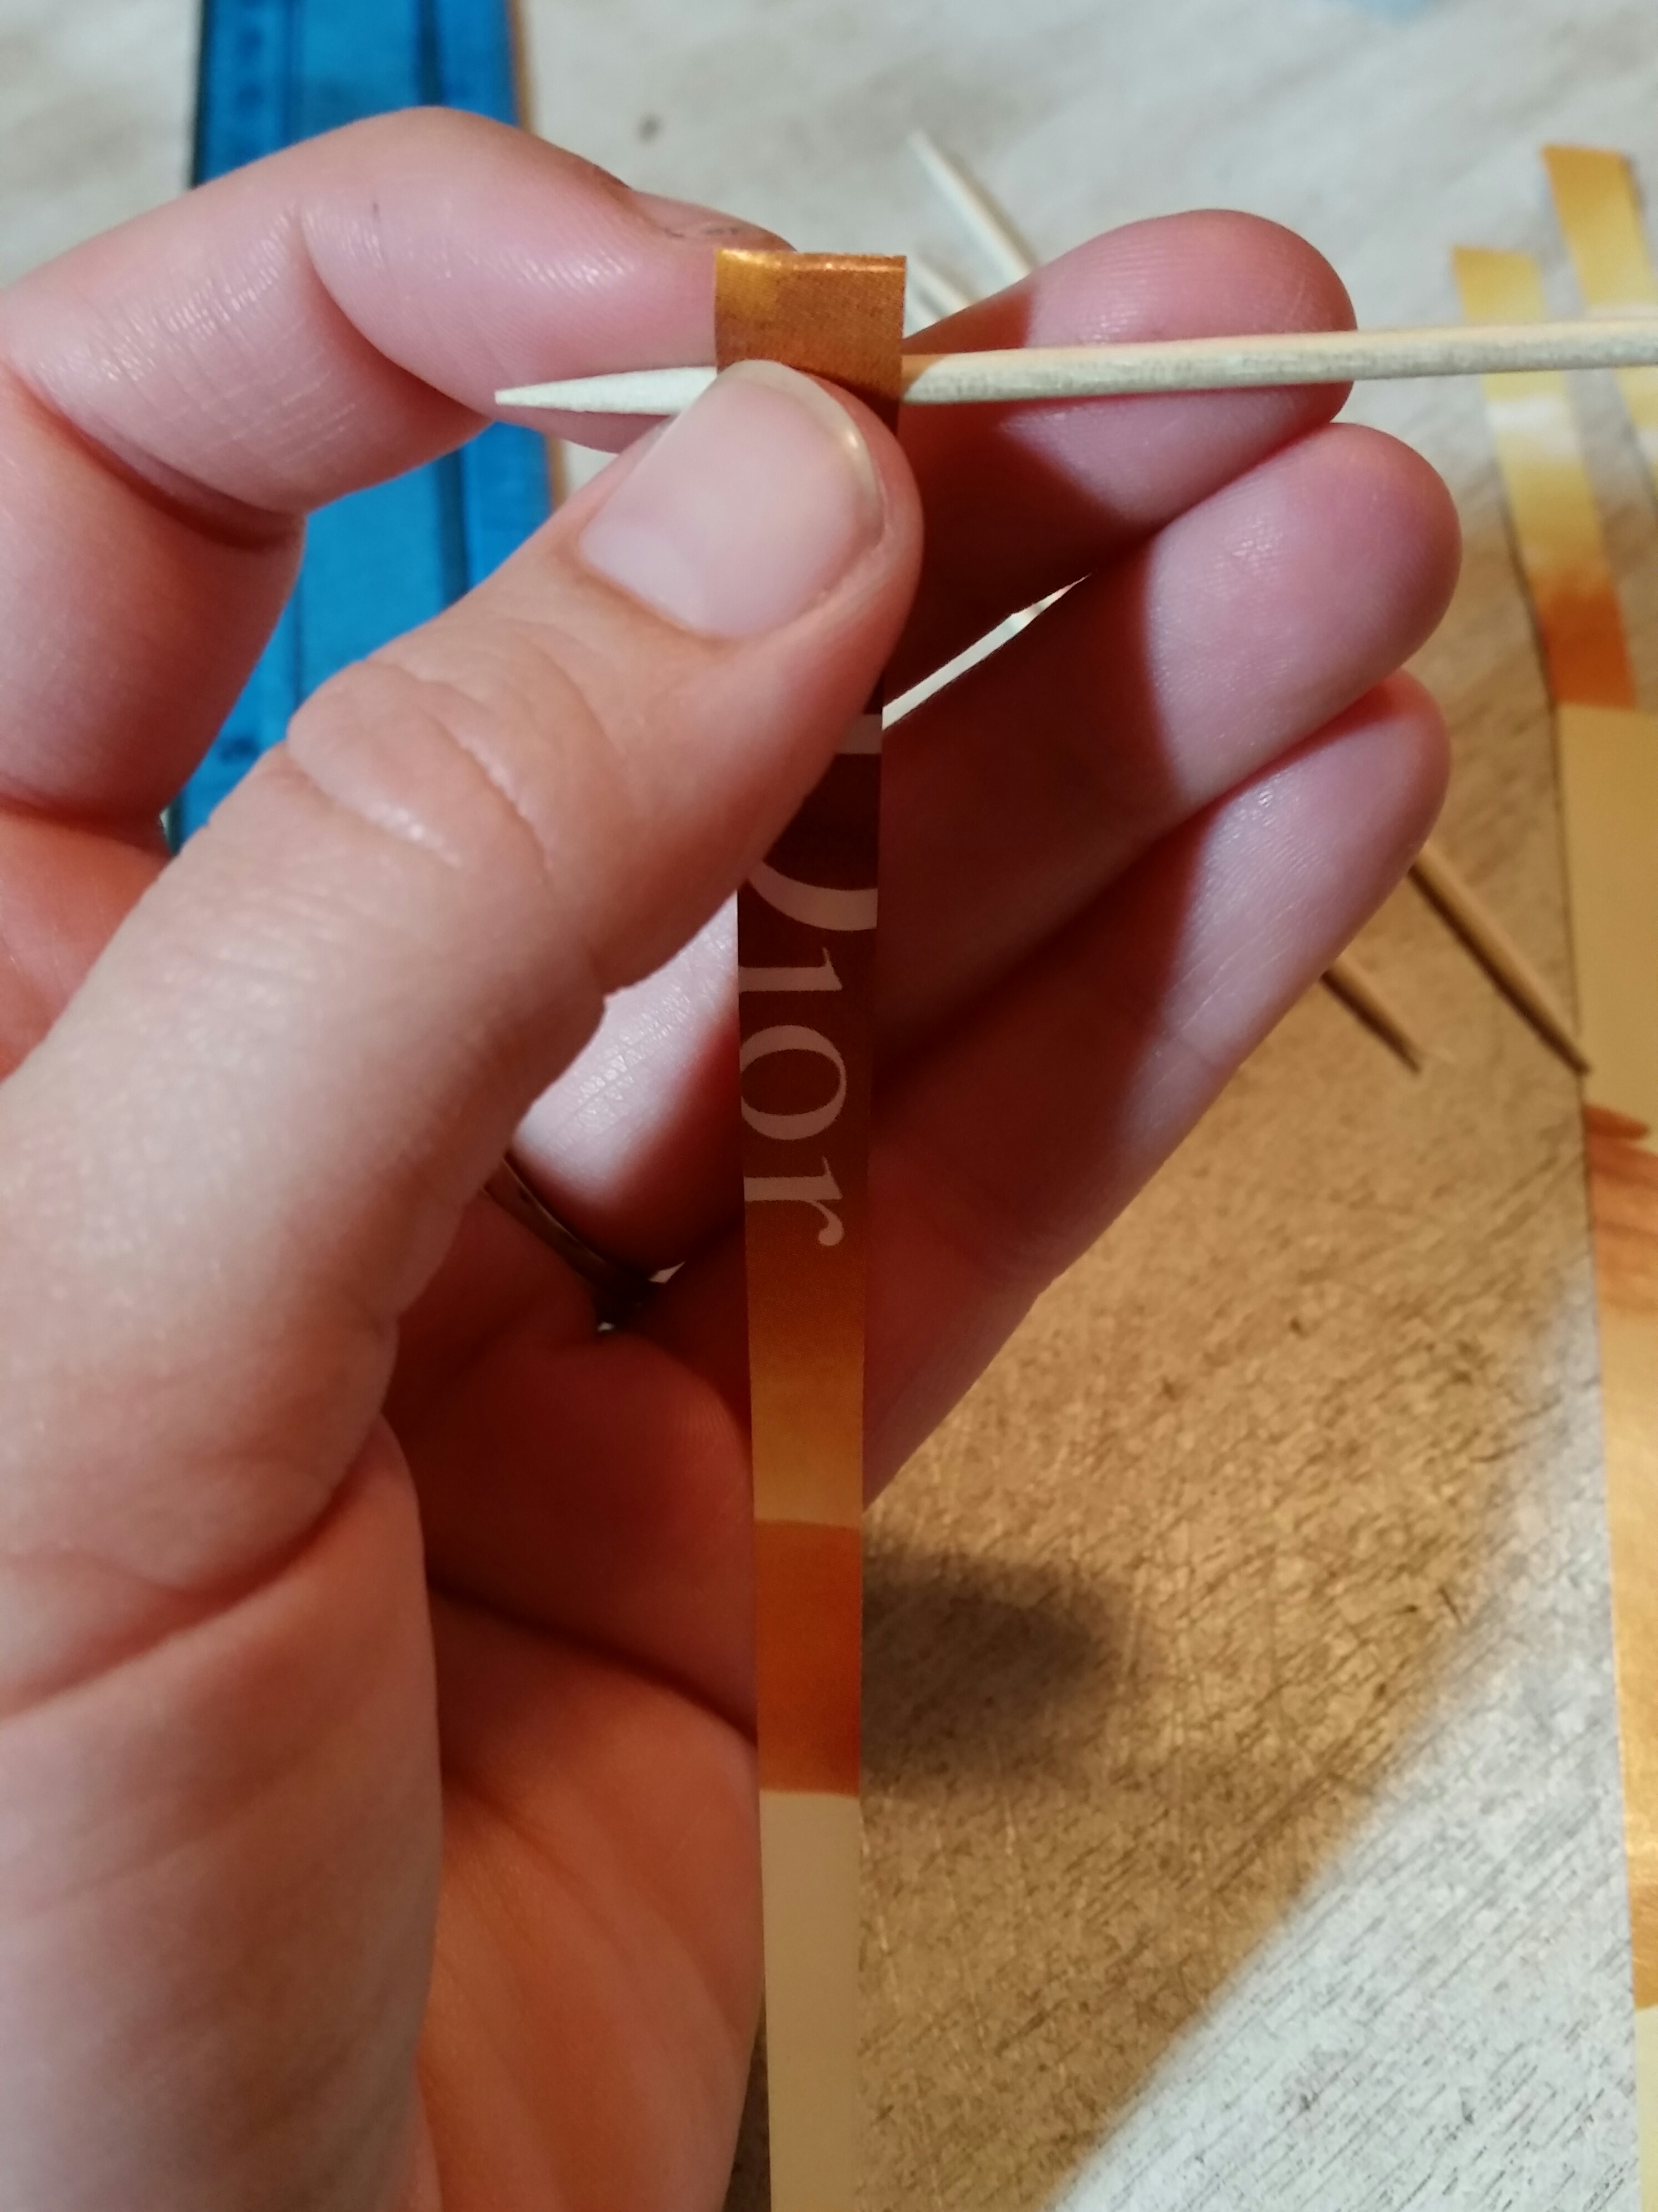 Begin by taking the fat end of your triangle and wrapping it around the end of one of the toothpicks. Make sure that you are far enough away from the tip of the toothpick, so that you have a good, regular base to act as the hole of your bead. Hold the paper tight and spin the toothpick until it “grabs” the paper and begins rolling up the paper.
I am right-handed, so I twist the toothpick with my right hand while holding the paper with my left. Use your left hand to guide the paper as it wraps around the toothpick. You want to keep it in the center of the “bead” and you will watch it grow the closer you get to the tip of your triangle.
 (Sorry that picture is blurry, I think you can get the idea, though.)
Continue wrapping and holding the paper tight around the bead until you reach the last little bit of the triangle.
 Put a small amount of glue on the inside of the paper and then spin the toothpick under your fingers while the glue sets and holds the tip of the triangle down. Be careful not to get any glue on the toothpick itself. It is a challenge to get the bead off the toothpick if it is glued to it.
When it holds its shape and doesn’t unravel, it’s ok to set the bead down. Since I’ve finished cutting all the strips of paper, I like to use my scissors as a holder for my beads while they finish drying and while I roll up more beads.
 It keeps the beads off of the table so that they can dry and not get stuck to anything. Leave them set for about 5 minutes (usually enough time to roll up the remaining toothpicks with beads.

When you have used up your toothpicks, it’s time to start sealing the beads. No matter what kind of sealant you use, the beads will not be waterproof. But at least you can give them a good shine. Grab your fingernail polish and run the brush around the bead a few times until it’s good and even, then rest on the scissors to dry. Again, be careful not to get the polish on the toothpick itself. Also, be careful not to let the bead touch the table because it will leave a blemish in the polish (much like when you paint your nails).
 When the beads have dried sufficiently (about 5 minutes), it is safe to remove them from the toothpicks. The easiest way to remove them is to twist them off in the opposite direction that you rolled them onto the toothpick. This is also a good reason to make it close to the end of the toothpick – sometimes the paper in the middle can shift when you pull it off. Twisting while pulling helps keep the shape of the bead.
Continue through the remaining strips of paper until you’ve made all your beads. Now you can decide what kind of jewelry you want to make with them. I am not a big necklace person, but I enjoy bracelets. I paired my paper beads with some small seed beads to make a wrap-around bracelet.
 I used hemp cording, a matching button, and jewelry floss. I often get comments asking if the paper beads are glass or plastic. They are a great conversation piece.
 Let me know how it turns out and if you have any questions.
Enjoy!
P.S.
If you like the idea of paper beads, but don’t like the idea of making them yourself, why not check out THIS organization? 31 Bits is an amazing organization that works with women in Uganda, giving them job training and skills to provide for their own families and rise above poverty. The name of the organization stems from Proverbs 31, where it describes a diligent woman providing and caring for her family, and from the “bits” of paper the beads are made out of. Pretty cool, huh? And the beads and jewelry look BEAUTIFUL!


Leave a comment