Getting Married: 11 Weeks – DIY Invitations #3

I can’t believe it, but the invitations are finally finished and they were sent out early this week. I am all about helping struggling businesses and I just want to say, “Kudos to the USPS!” Mom dropped off the invites to the post office on Tuesday afternoon. The AFTERNOON people! And I was tagged in a friend’s photo of them on Facebook by late Wednesday morning! Unreal! Friends in Kentucky even got theirs the next day and RSVP’d and everything!

I’m so pumped. We chose to have our RSVP’s go through our wedding website (http://weddingwire.com/MattandSarahMartin/) and I get an email every time someone uses it. I know about half the people, so some names are a little bit fuzzy for me, but I know Matt will be excited when he sees them.

Funny story. We had to make our reception RSVP only since we have such a large family population coming. It’s been sad to have to cross some people off our list, but we hope they can still make it to the wedding ceremony. Anyway, since we were sending invites to some people even though they weren’t going to the reception, I had typed up two lists for my bridesmaids to write from so we didn’t mix up who got a reception card and who didn’t. The last two weeks have been haywire for me. I work 54 hours last week alone and this week was even more. I was so wiped out typing up the lists that I made a couple of typos.

No, Amy, it wasn’t your fault (even though there were a few envelope casualties). I misspelled the first names of a couple of Matt’s guests. “Arron” became “Aaron.” So, sorry, but it would be a common mistake, I’m sure. “Bob” became “Bon” and we had quite a lot of fun making James Bond-esque jokes. Yes, that we did.

The topper was my grandmother, whose last name I mistyped. She has such an easy last name too, but there it was, written on the envelope as “Dorothy Book.” I am baffled that it even got to her considering I put her in Latrobe, Ohio instead of Latrobe, Pennsylvania. I guess it’s a blessing that I got the zip code right. Another kudos to the USPS! Y’all are beasts!

On to what I’m sure you’re really here for. As a recap, let me point you back to a few other posts in this series.

Week 37 – DIY Invitations, Week 20 – DIY Invitations #2, and Week 15 – Review: The Darkroom.

Despite the work it took, I had a lot of fun making these. It was my first time doing anything on this scale. I perused online for some ideas and tips, but most of it just came from my brain. I never know how things will turn out when they come from my brain, but I am really pleased with these. Here we go.

week 11 invite front

Sorry for the shadow at the bottom. I’m not very skilled at photo-taking with my phone yet. The concept of lighting is nearly lost on me. I saw something very similar to this stamp set on another website. I may have linked to it in the Week 37 post, but I can’t remember. It’s a two-stamp set. One has our names in a pretty font, and the other is the ampersand. These, I actually cut myself out of a rubber pad and glued onto a block of wood to use for pressing. It took a long time to cut out and a long time to get comfortable using, but it is probably my favorite part of the invitation. The bird in a tree stamp was a quick buy from Hobby Lobby. I fell in love.

week 11 invite inside

Color blocking has been real popular in recent seasons. I wanted the invitation to focus on this kind of style. I bought both of these stamps at Michaels – the M came from one of the dollar bins. It was perfect, except that the indents on the side of the stamp were really on the top and bottom and didn’t help with comfort when using it. Of course, I did stamp something 1,776 times for these final invitations so that might have been a factor as well. We did the math, and it turned out mighty patriotic, so I guess it’s all for good. 🙂 The wildflower stamp at the top was so worn by the time I finished, you could barely see the black “preview” image on the top of it.

week 11 invite insert

Just to be clear, I faded out my phone number on the RSVP cards. I don’t want random people getting my number and harassing me. I already get that dumb “The FBI reports an increase of break-ins in your area…blah blah blah” message all the time on my mobile. I don’t need other misery with it. These are just standard cream paper glued to yellow cardstock glued to red cardstock. Very easy. Glue sticks are wonderful. Next!

week 11 stamps

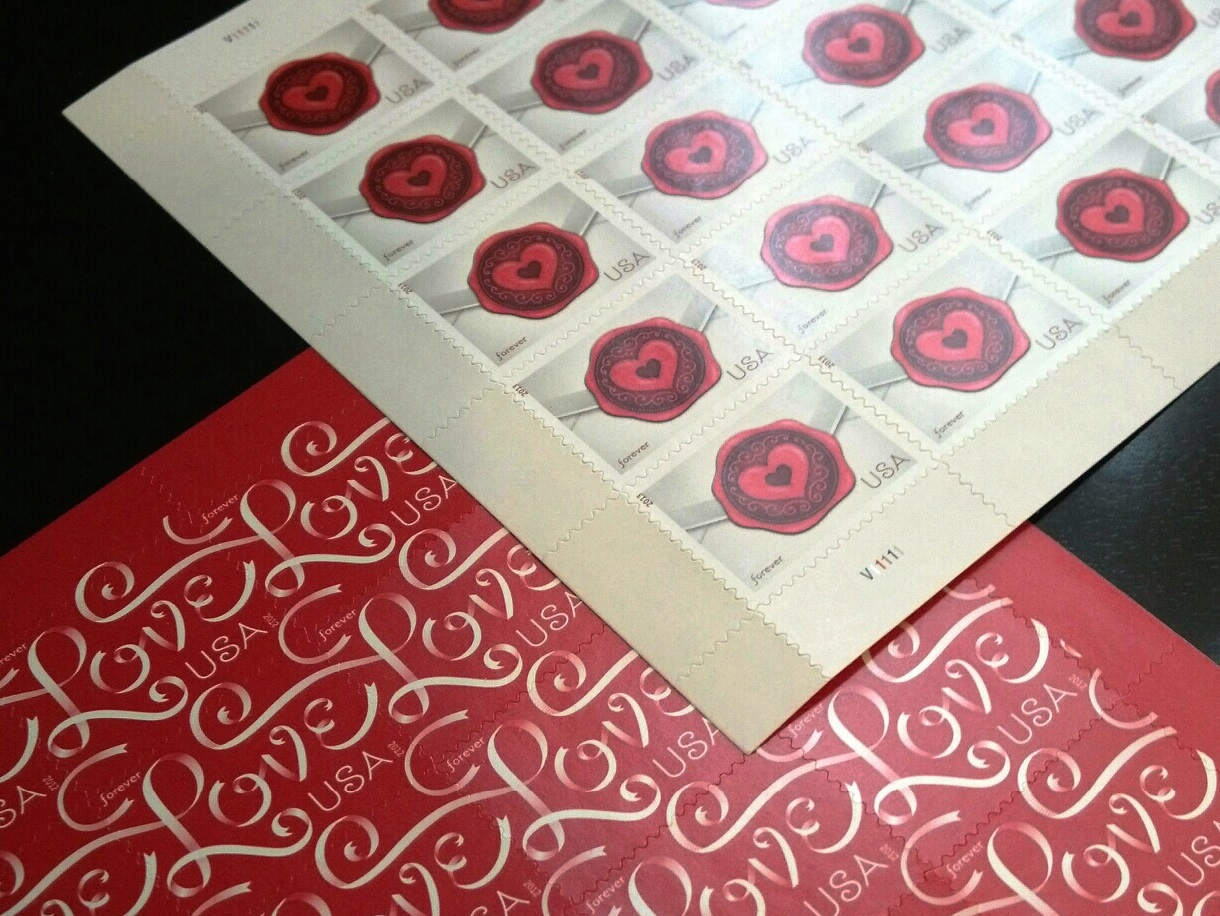
The USPS comes out with new lovey stamps right around February. I managed to get last year’s Love ribbon Forever stamps AND a couple of weeks later got this year’s heart envelope stamps. I like these way better than the dorky wedding ones. No offense if you like those. Plus, these match one of our colors. 😀 I ordered the heart envelope ones through the USPS website and they came in the mail super-quick. That’s kudos #3 for you USPS…right? #4? #16? Oh, I can’t keep track.

week 11 invite back

Our faith is so very important to us. We thank God for the blessing He has given us in each other and our relationship. This day is one of many days to celebrate, rejoice and be glad in it and who He is – the Giver of good things.

—————————–

I’m getting married to my, you guessed it, best friend on June 1st, 2013! Matt and I are super-excited and since we have quite a bit of time to plan this thing, I decided it’d be fun to blog about it. Well, maybe not always fun, but at least informative and it might give me a welcome distraction. You can find all the posts by clicking the “Getting Married” tab on the right of this page, or by clicking here. Thanks for stopping by!

My Pinterest Wedding Board

Our Wedding Website on WeddingWire.com

Getting Married: 15 Weeks – Review: The Darkroom – Fairfield, OH

For a quick summary review, you can skip to the bottom of this post. Everything else is all flowery and verbose and not for Cut-To-The-Chasers.

We tried to do completely DIY Invitations and aside from making the paper ourselves, we were on track to doing just that.

So here’s what happened. I’ve been saving up invitations of my friends for years to be sure I had a wide variety of wording and designs. They’re also just great memories of the lives I’ve been able to have as friends, many of whom are now out-of-state and have homes bustling with kids. I heard there would be a huge stationery sale at Michael’s one day and I had another 20% off coupon, so Matt and I went through and found packs of 50 invites/envelope sets. We picked up 4 and some other sheets of paper and went on our way.

I started brainstorming the design and we discussed the wording. I typed it up, made the adjustments for the dimensions of the invitations and emailed it over to Matt for him to print out. Only, the font didn’t keep, and when I saved the file as a pdf, it wouldn’t hold the dimensions. So, Matt had to play around with it for a while and when he finally got it to print the right way, he was running out of ink and some of the lines bled.

I was getting a little stressed about it before all this and that was worrying Matt. He’s so sweet to me. He said that this was a problem he would solve and I wasn’t to worry about it any more. He took the invitations over to Staples to see if they would be able to print them but they refused saying that they don’t work with paper of those dimensions. (Rule of thumb: When getting paper on discount, be sure that the dimensions are something that can be readily put through a printer!) Staples said that a smaller print shop might be able to do it and Matt remembered the developer shop down the street that printed our engagement photos and Christmas gifts (we gave out some framed copies to family members).

This developer shop is called The Darkroom and I’ve mentioned it before in this blog series. They are, honestly, my new favorite place. Before planning this wedding, I’ve only used them less than a handful of times, opting for the quick develop shops, or online developing. The quality of the prints I’ve got from The Darkroom makes the adage ring true, “Good things come to those who wait.” And the wait is not that long at all. They will work with you on a deadline (within reason, of course), but they seem very flexible and determined to help you out.

Week15 Darkroom Logo

The Darkroom

1195 Hicks Blvd
Fairfield, OH 45014
513.829.3154
Website

Matt dropped off the paper and the file and presented our case. The man readily accepted the challenge and was to call me when he had a proof completed so I could see the result. The difference was amazing! He and I discussed the price (since we had brought our own paper, they didn’t have a set price for just printing invitations) and came up with an agreeable settlement for the both of us. Those weeks learning how to bargain in China and Egypt really paid off! In the States, we don’t bargain much, so I didn’t haggle the price as much as I did in those countries, but it was fun to do on my home soil.

The Darkroom has so many products and services, it really is amazing. Here I thought they just developed pictures! According to the website, they provide the following:

  • Hardbound Lay Flat Photo Books
  • Canvas Prints and Gallery Wraps
  • Fine Art Metals
  • Candids, Portrait Units (which include – Magazine covers, key chains, luggage tags, trading cards, photo buttons, fridge magnets, t-shirts, coasters, keepsake box, coffee mugs, aluminum water bottle, and mouse pads.
  • Shoot for special events and Prom
  • more information on the website.

Within a week’s time, I received a call that the invitations were ready and Matt swung by to pick them up. They turned out beautifully! Now I’ve had the task of handstamping the details, but the text is lovely, precise, and just what I wanted it to be. I would put up a picture, but I want the final result to be a surprise to my guests, so that will just have to wait for an update until after the invites have been sent out. I’m sure you’ll understand.

So here’s the breakdown:

The services:  I didn’t even know that The Darkroom did invitation printing, but Matt happened to notice it on one visit there. We saw another sample set out and it was exquisite, with beautiful embellishments and colors. So, they provide this particular service and just about any other service one would imagine along with photo services. You can find them here.
The help: Richard Braun and the ladies who help out there (I’ve never caught their names, but they are lovely) are very helpful and attentive to their customers’ desires and needs. Richard has been doing this for years, and worked with his father who started the business 34 years ago.
The parking: They have their own parking lot. It’s kind of across from Skyline and near an intersection on Route 4, so sometimes traffic is a bit tricky if you park in the spots along the road.
The facilities: The shop itself is small and unassuming, but I’ve only seen a small part of it inside. I will tell you, though, that someone on staff smokes, so you can smell it when you first walk in. However, the smell didn’t transfer on my invitations or photographs at all.
The results: The results are highly professional and just what you order. If they can’t do something, I’m sure they will tell you, so you have realistic expectations of what you are going to get. The color in the picture prints was lovely and my invitation text was crisp and exactly what I had wanted.
The price: Price is very reasonable for a professional shop. If you’re looking for a cheap shop, then this isn’t for you and maybe an hour developer is what you’re looking for. But you get what you pay for. The quality just is not going to be the same.
Returnability: I plan to use this shop much more in the future, even though I won’t be living in the same zip code. I anticipate bringing our wedding photos to be developed here as well.

Thanks for the read!

—————————–

I’m getting married to my, you guessed it, best friend on June 1st, 2013! Matt and I are super-excited and since we have quite a bit of time to plan this thing, I decided it’d be fun to blog about it. Well, maybe not always fun, but at least informative and it might give me a welcome distraction. You can find all the posts by clicking the “Getting Married” tab on the right of this page, or by clicking here. Thanks for stopping by!

My Pinterest Wedding Board

Our Wedding Website on WeddingWire.com

Getting Married: 20 Weeks – DIY Invitations #2

This week, I started working on the invitations some more. You’ll remember that last year, I started working on the hand stamps I planned to use for them. You can find that post here.

First came the wording and the placement of the text on the card stock. I have been saving wedding invites, save the dates, programs, etc for years now. I gathered them all into bag and have been reading through them, getting ideas on verbiage and layouts. Matt and I discussed certain details we wanted, needed, and didn’t need in the invitations. One detail was that we didn’t necessarily need to have the names of our parents in them. We love our parents, but we are kind of pressed for space. Also, it seems that couples include the parents’ names when the parents are the ones throwing the wedding. Given our age and stages in our careers, we’re able to handle most of it on our own, so we’re throwing our own wedding. We, therefore, settled on including the line “Together with their families.” This includes more than just our parents in the invitation as well, since we are both close to our siblings and others.

Another tricky wording was that of the reception. Our ceremony is open, but the reception is a closed event and by special invitation only. However, how do we convey that in an invitation that we will be sending to everyone? After some wordsmithing and testing phrases out, we decided to include after the ceremony details this sentence: “Private reception to follow.”  For those who are invited to join the reception, there will be a separate insert with reception information and instructions to RSVP on our wedding website.

Now we’re just trying to figure out how to print them from Matt’s printer. It works really well, but so far, I haven’t been able to save the file as a .pdf  with the right parameters of the invitations. Oh well, that problem is fairly easily solved.

Next is how to easily replicate the same pretty look of the invitations using my homemade stamps. I really wanted to use paints instead of inked stamp pads. One major problem with the stamp pads is that I could not find a good, sweet looking yellow. I looked in a bunch of different shops and couldn’t find anything…even on the Stampin’ Up page. I was shocked!

So, I opted for my old reliable medium: acrylic. I grabbed a paintbrush and painted some yellow over the stamp and then pressed down. The image was alright, but I knew I’d have to rinse off my stamp before the paint dried. FYI – acrylic paint will not wash off after it has dried onto a stamp. Wash it off immediately. This went directly against the “easy to replicate” stipulation.  When I bought the rubber pads and tools to make my stamps, I also picked up a Speedball roller and some paint for it. I tried it out just for the heck of it, but that paint is also acrylic, so that’s a no-go.

The next idea was to get some washable markers and try inking the stamps that way. The image turned out a little faint and I ended up having to use the markers to fill in spots that didn’t transfer. Also, I wanted to have more of a watercolor image and that meant using a wet paint brush to extend some of the ink. This also went against  “easy to replicate” so I went back to the internet to search for some yellow ink pads.

Success!! Amazon carries a couple different shades of larger ink pads, so I ordered them and now I just have to wait for them to arrive before I can test them out more. The following pictures will give you an idea of what my Thursday afternoon looked like.

IMG_20130112_143654 IMG_20130112_143926

I can’t wait to finally get a finished product and get started on the rest of them. It will be quite a project, but I’ve got some wonderful ladies who have volunteered (right? You all did volunteer, right?????) to help me finish them. Just have to find what works best!

Did you buy your own invitations? Did you make them? What kind of roadblocks did you have?

—————————–

I’m getting married to my, you guessed it, best friend on June 1st, 2013! Matt and I are super-excited and since we have quite a bit of time to plan this thing, I decided it’d be fun to blog about it. Well, maybe not always fun, but at least informative and it might give me a welcome distraction. You can find all the posts by clicking the “Getting Married” tab on the right of this page, or by clicking here. Thanks for stopping by!

My Pinterest Wedding Board

Our Wedding Website on WeddingWire.com

Getting Married: 37 Weeks – DIY Invitations

As much as possible, I want to DIY our wedding.  One easy thing to do yourself is the invitations. Let me say that I love stationery. I love letter writing, sending postcards (which is why our guestbook will be postcards instead of a traditional book), and sending Thank You notes. In fact, I’m a compulsive Thank You note buyer. I have two shoe boxes full of Thank You notes I’ve accumulated throughout the years, which I know will come in handy after the first bridal shower and such. I have never really tried to make my own stationery, though, and my only attempt at scrapbooking was in high school when I took an old binder and filled it with pages, photos, and even a book I had to make in French class about what I was like as a child.

That kid at the bottom is my now 20 yr old nephew…eesh!

I know what you’re thinking…SIGN ME UP! But I love trying new things and I really think that this will work. 🙂

My first order of business was to brainstorm what I wanted them to look like. I saw these invites and fell in love with them. And then I saw these and thought they were a bit more feasible. So I set out to make my own stamp. I’ve never done this before either, but it sure looked like fun, and considering I have 37 weeks to go, I’m ok with trying some things out before we need to get serious. I’m not going to show a finished product of the invites until we send them out, but you are welcome to see the process of, at least, this attempt.

I went to Michaels and bought a Speedball kit and a soft rubber stamp pad. Since I’m new to this whole process, I thought better start with the soft than the harder linoleum block. I sized my stamp and then pulled up Powerpoint. This is my picture manipulator of choice. I’m probably super old school saying that, but you make do with what you have and I have Microsoft Office! I typed up the wording and positioned the pieces where I wanted them.

Then, I took the little bit of tracing paper that came in my kit and put it up to the computer screen, sketching the letters out lightly with a No.2 pencil.

Once I had the design on the transfer paper, I flipped it over and pressed down the back of the paper so that the pencil marks went onto the rubber. It’s really important to do this gently, since you don’t want the design to get smudged. It goes on backwards, too, which is just want you need for a stamp!

Once the design was on the rubber, I began to carve. I probably didn’t do this the right way, but it turned out really well once I had it all cut out. The kit I bought came with two sizes of blades, one for larger areas and another for the detail cuts. Here was the finished product for that, and the sample stamp.

The hard thing about these stamps is that they’re a bit flimsier and tough to get a consistent image. So, I ran over to Home Depot to see what kind of scrap wood I could find to mount it and the other stamps on.

I know they’re not really scraps, but they will do the trick, and with a little wood glue, I have nicely mounted stamps to use!

That’s an ampersand, by the way. I think it’s gorgeous. So there you are. My stamps so far. Matt and I were super please when a month ago, we went into Michaels and they were having a crazy huge sale on blank cards. We got a steal on the basics for our invites…now I get to play around and figure out what I want. In the mean time, I’m enjoying experimenting on the left over pieces of rubber I have now.

The one on the left is supposed to look a bit like an elephant. Ok ok, I’m workin’ on it! 🙂 I’m still brainstorming here.

—————————–

I’m getting married to my, you guessed it, best friend on June 1st, 2013! Matt and I are super-excited and since we have quite a bit of time to plan this thing, I decided it’d be fun to blog about it. Well, maybe not always fun, but at least informative and it might give me a welcome distraction. You can find all the posts by clicking the “Getting Married” tab on the right of this page, or by clicking here. Thanks for stopping by!

My Pinterest Wedding Board

Our Wedding Website on WeddingWire.com

Getting Married: 46 Weeks

I was looking forward to the week following the last post since I figured we had the two big things booked and locked away, so I could relax a bit, enjoy being engaged. Sadly, southwest Ohio weather had another idea. I started getting a bit of a sore throat by Sunday night which progressed to a full-on sinus infection by Thursday. That made for a miserable week with barely any sleep, lots of coughing and a Z-pack.

While I haven’t been up to par, that doesn’t mean we didn’t make any headway on the wedding plans. We decided to do our own invitations to save some money. I’m excited and have been brainstorming ways to make them fun and creative without going overboard. Matt met me near my work place on a half day to have lunch and hang out a bit before going in to work the afternoon. We stopped into Michaels to peruse. I’m glad we did. They were having a fantastic sale on paper and stationery. We got an amazing deal on the blank card stock and envelopes we need for invitations including some card stock for embellishments and our separate reception invitations. When I say, “We got an amazing deal…,” I mean, we got everything paper that we needed for under $50, plus some fun red/yellow flowery things that we can use to decorate for the reception. I can’t wait to start experimenting with designs and trying out different things. I will post some of the outcome on here for you all when I get them going.

After chatting with my sister one night, I decided I should go ahead and schedule my wedding dress shopping date. There has been a great summer sale going on at David’s Bridal this week, but it seems too soon to go get my dress already. We’re planning to go on Labor Day weekend, hoping for a sale, and also hoping that I can get myself in a little better shape by that time. There are going to be 10 of us there if everyone can show up! It’ll be so much fun though, and I want to try on the truly awful dresses too, so I’ll have some pictures for you.

Well, here’s hoping that this week is much better than the last!

—————————–

I’m getting married to my, you guessed it, best friend on June 1st, 2013! Matt and I are super-excited and since we have quite a bit of time to plan this thing, I decided it’d be fun to blog about it. Well, maybe not always fun, but at least informative and it might give me a welcome distraction. You can find all the posts by clicking the “Getting Married” tab on the right of this page, or by clicking here. Thanks for stopping by!

My Pinterest Wedding Board

Our Wedding Website on WeddingWire.com