Recipe: Crock Pot Beef Stew

It’s been a while since I’ve had beef stew and I’ve never made one, until NOW!

And then, I couldn’t really find a great recipe online. So I asked some ladies at work if they’ve made it and have any tips – and one did! Gretchen overheard me asking and came over to give me a play by play of putting together a beef stew in the crock pot. I am going to give MY actual recipe used but also share some variation notes which I didn’t use. I more or less borrowed from a few other recipes and…improvised when I didn’t have the right ingredients. Yay for cooking!

20150110_203049_1

Ingredients:

2 lbs beef chuck roast, cut into 1-inch pieces
1-2 tablespoons of coconut oil
1 daikon, chopped (about 1/2 cup) (sub with 1 cup sliced celery)
2 medium carrots, sliced
5 medium gold (or red) potatoes with skins, diced or sliced, whichever you prefer (about 1 – 1/2 cups)
1 medium yellow onion, diced (about 1 cup)
1 garlic clove, minced
1 bay leaf
1 can tomato soup
1 32 oz carton of beef broth
water, as needed

Herb Mixture:
1 cup flour
1 tablespoon dried parsley flakes
1 teaspoon salt
1/4 teaspoon pepper
1 teaspoon red pepper flakes
1/2 teaspoon rosemary
1/4 teaspoon thyme

Directions:

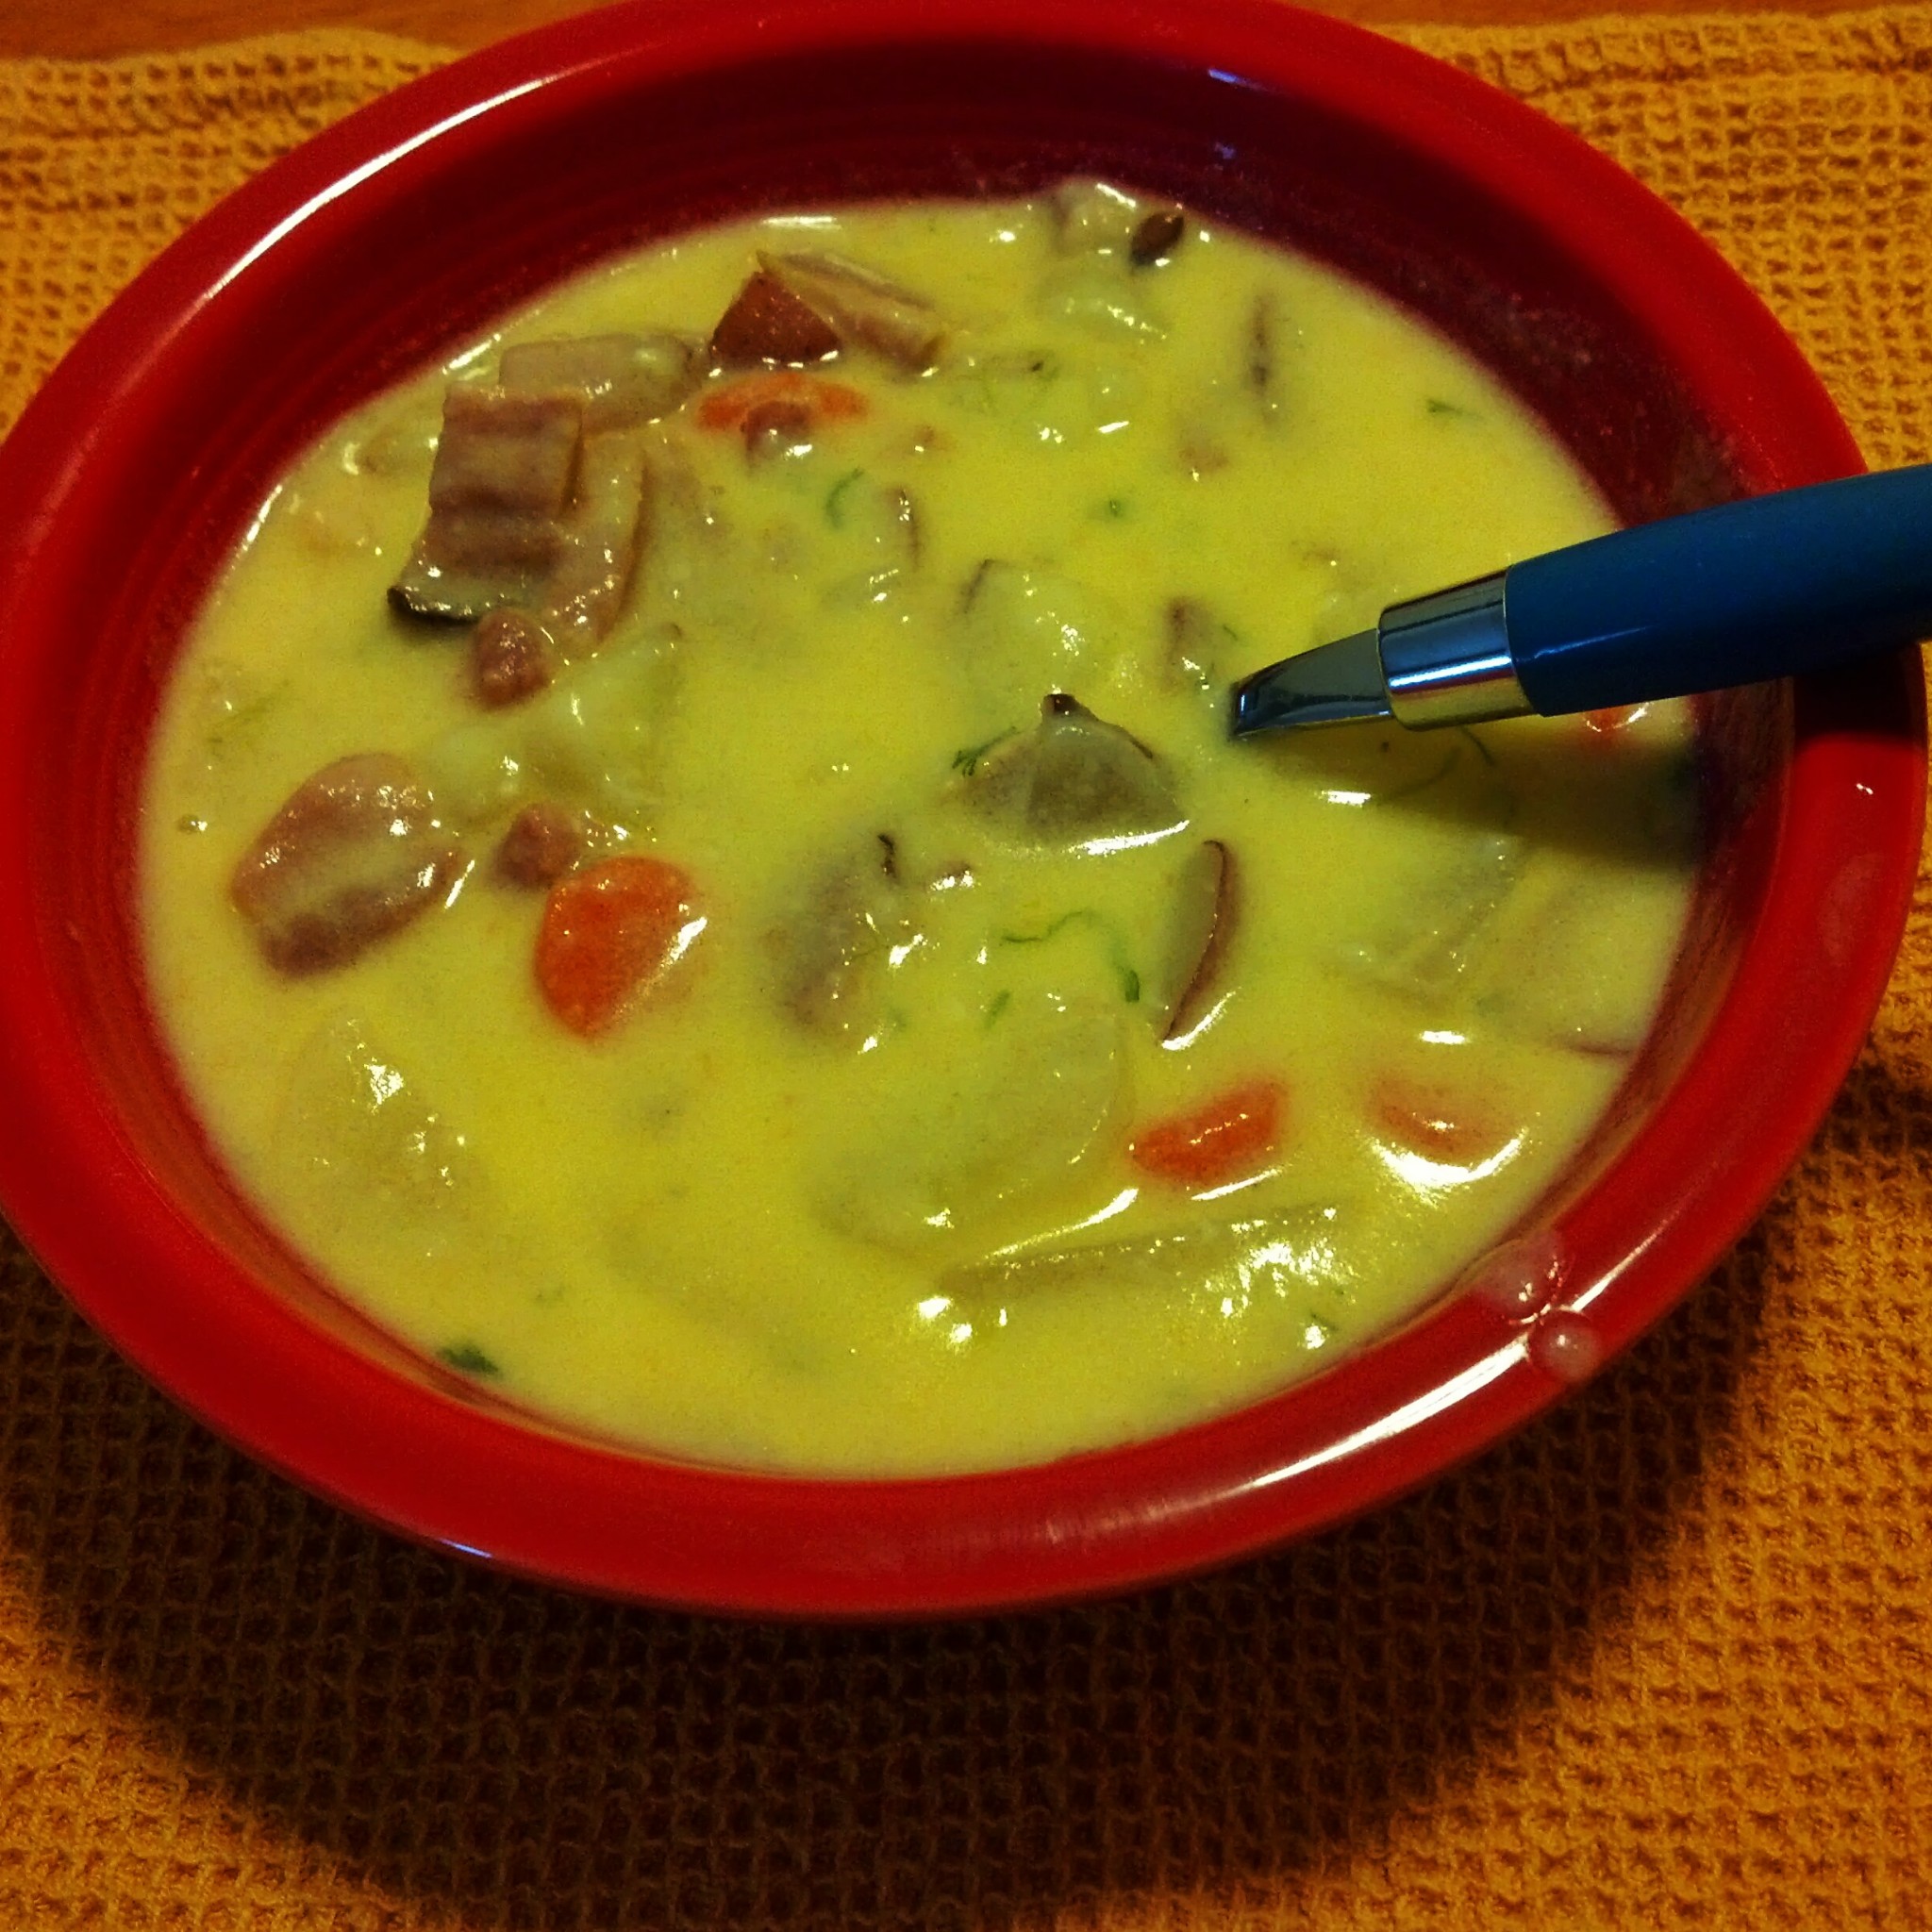
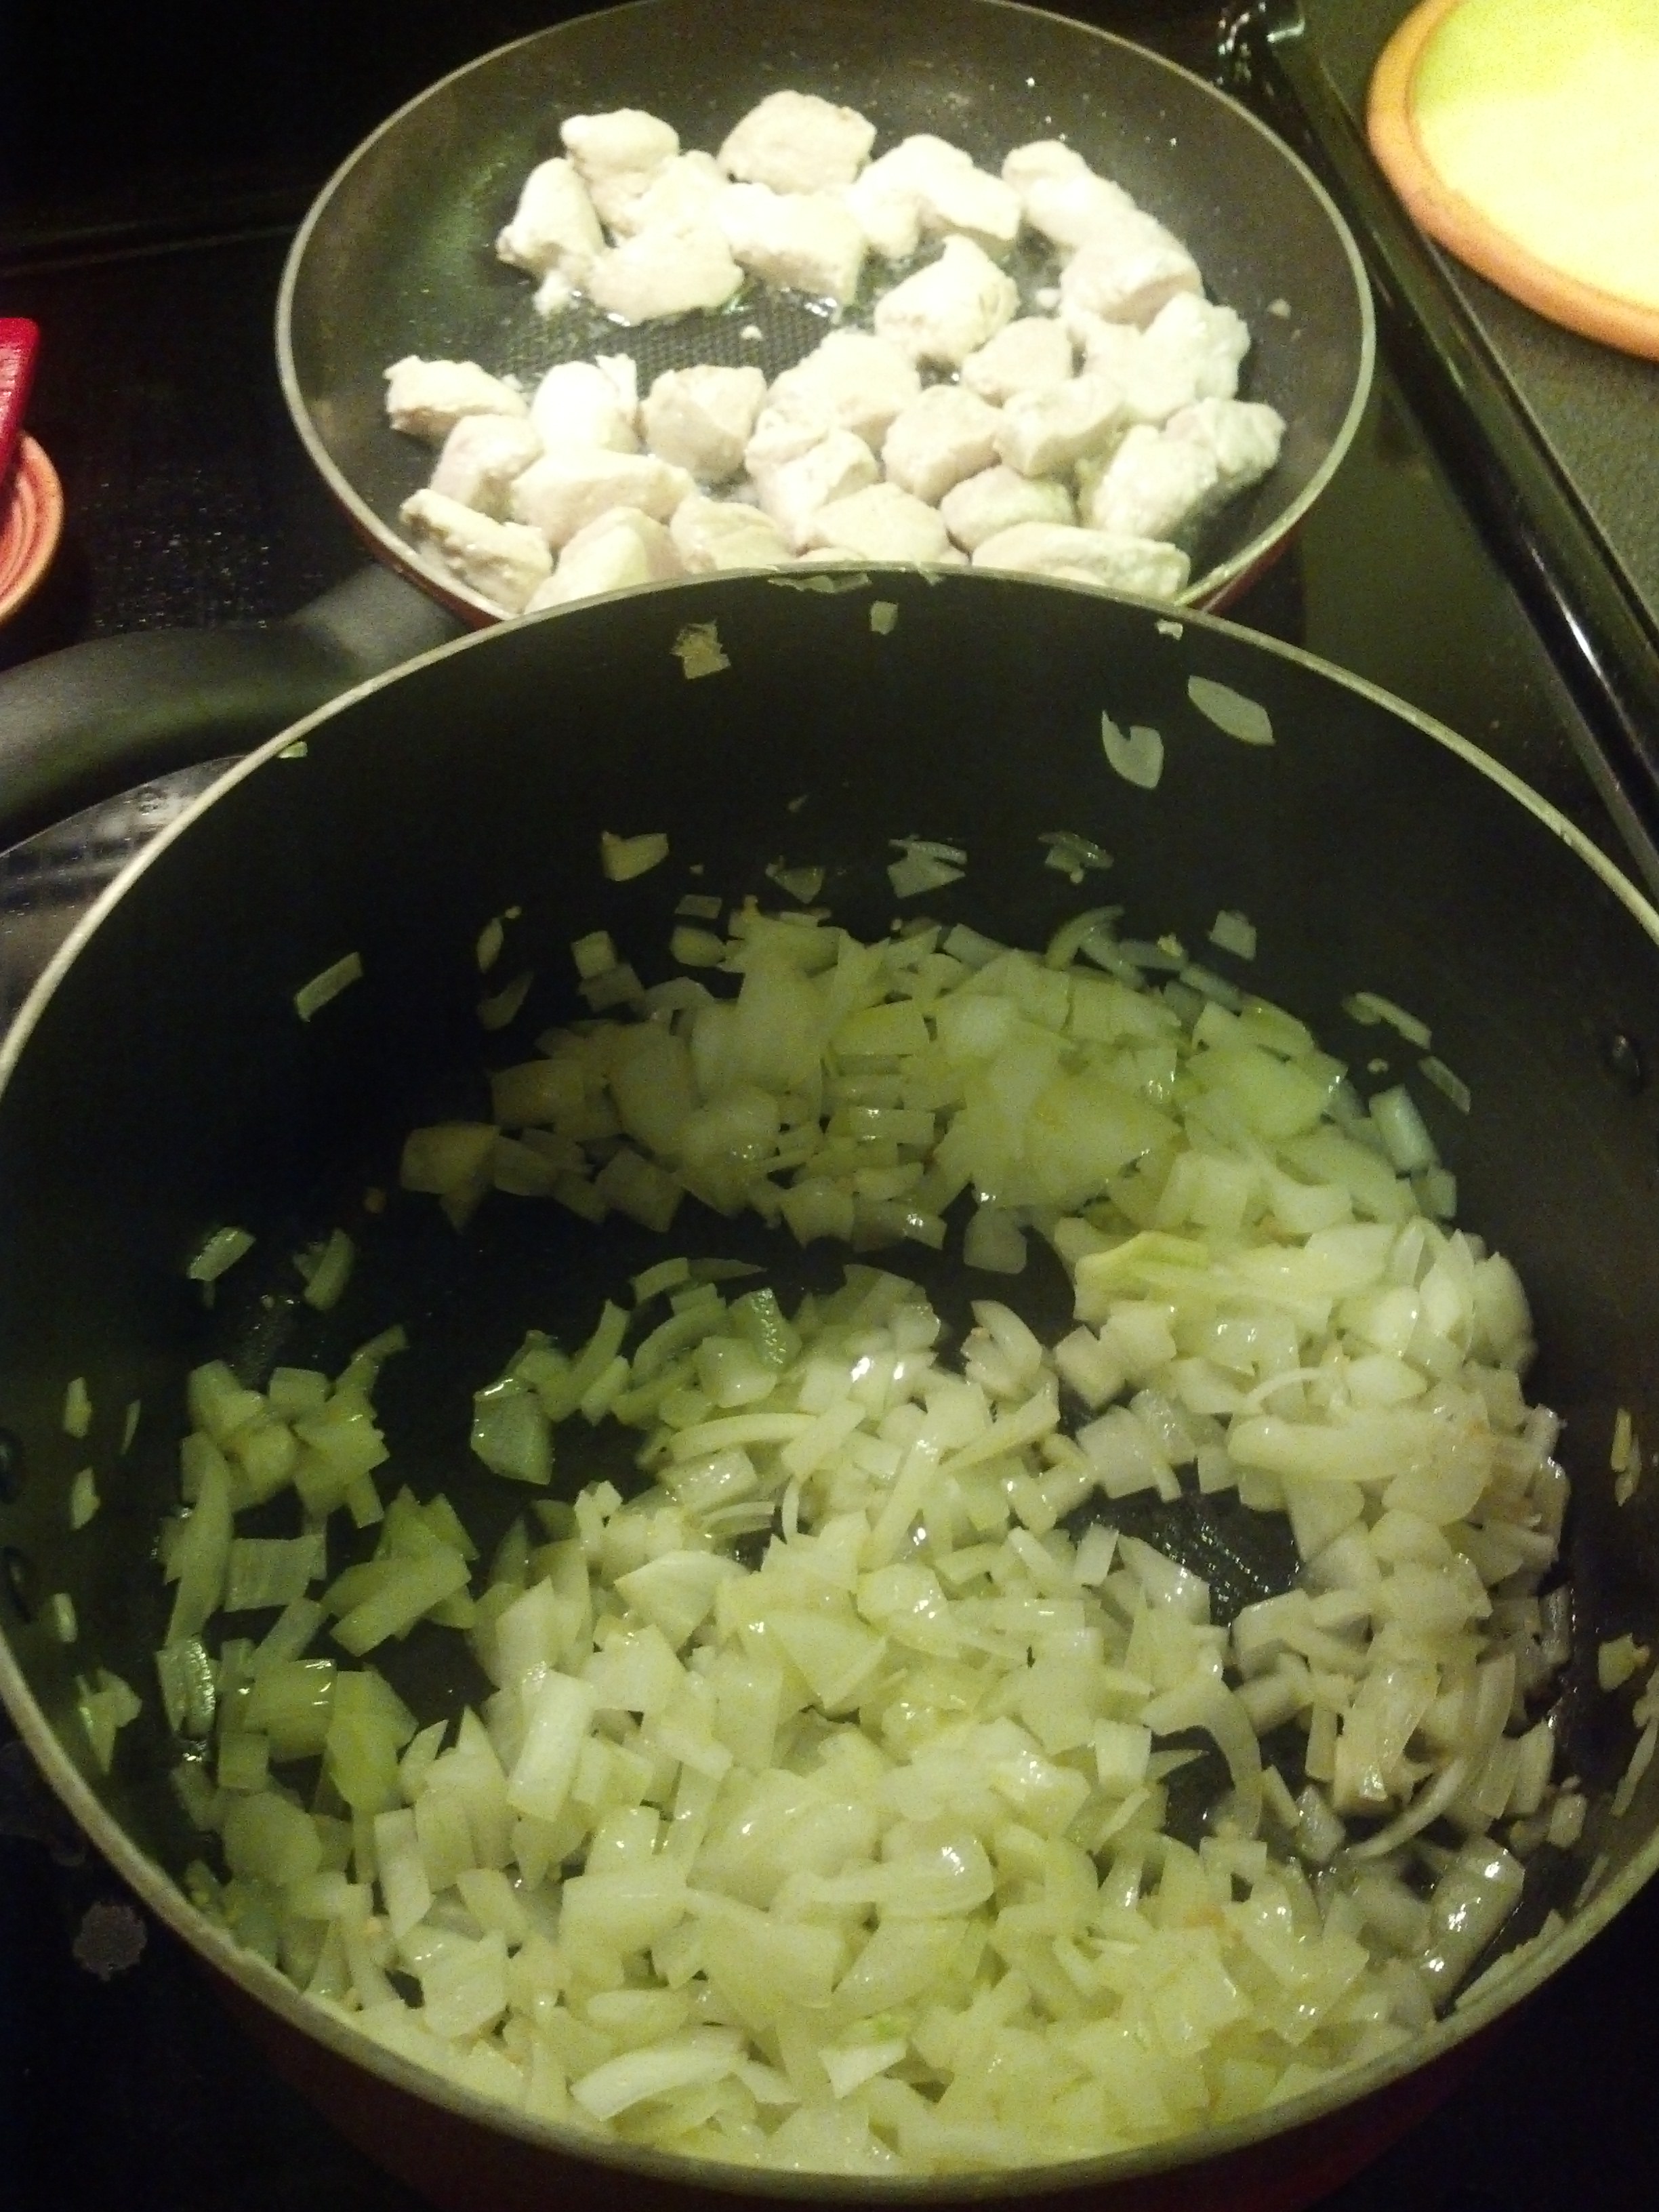
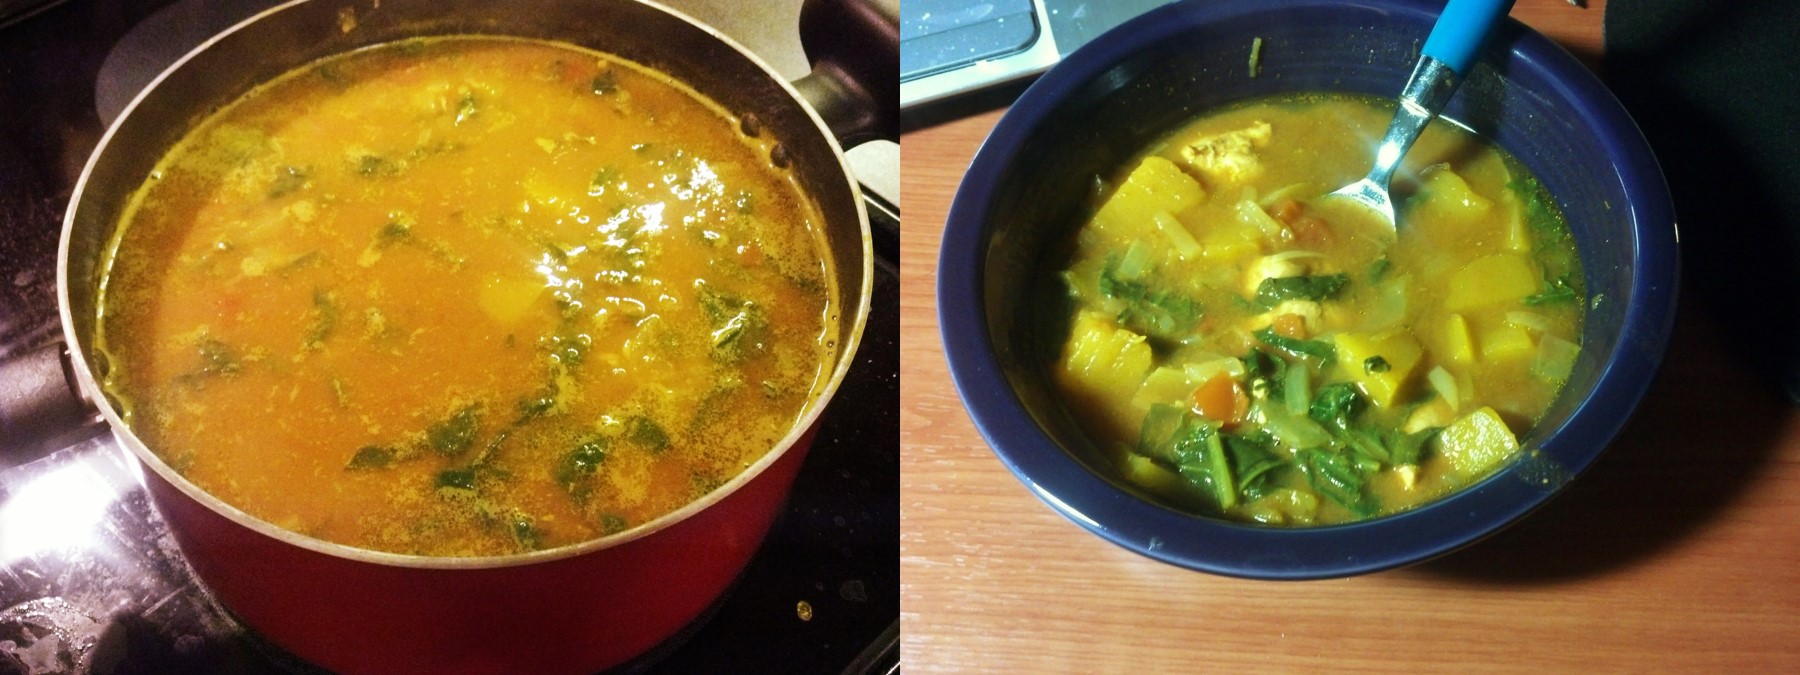
1. Put the coconut oil in the bottom of the crock-pot. Then begin preparing your veggies. I did not leave the ceramic bowl in the heater basin, so that I could add the veggies as I chopped them. Per Gretchen, start with your hardest veggies first and layer up. My order was daikon, carrots, potatoes and onions. I guess that if you used celery, you would do carrots first and then celery. I forgot that I had bought some spinach to add in, but it stayed in my fridge until it was too late. I wish I had, would’ve been pretty. Top the veggies with the minced garlic.

2. Prepare the herb mixture. I was told that this is the key to getting a good texture to the soup. I just know that it tasted so good. In a small-medium bowl, add the flour and the spices mentioned above. Throw them all in and toss the mixture so you’ll have a good breading.

3. You do not HAVE to rinse beef, but mine was kind of bloody, so I did just a little. Also, it was the same price at my butcher to buy a full chuck roast or the pieces already cut. I’m all for making my life easier (and saving time in the kitchen) so I bought the pieces already cut. They looked a bit big, but once they were cooked, they were perfect. Toss the pieces into the bowl and cover completely with the herb mixture. Then lay the meat on top of the veggies. You should have a fairly heaping display of ingredients there. It was pretty impressive to me.

4. Pour the tomato soup over the beef pieces, as is. The recipes I read included either pieces of tomato, or tomato paste. I didn’t have any of these, and I’m not a fan of tomato, so I didn’t use it. Gretchen recommended forgoing the tomato paste and beef broth altogether and only use V8 juice. You could definitely try this, but I didn’t have time to pick it up. Break apart the bay leaf and drop onto the top of the ingredients.

5. At this point, I moved the ceramic bowl back into the heat basin. Pour in the beef broth and then add water until the bowl is filled to one inch below the top.  If you decide to go for V8 juice, just be sure to fill up to the same level.

IMG_20150110_195713

6. Add cover (do not lock the lid down, if you have that capability) and set on low. Cook for 6-8 hours.

7. When finished, stir the soup, making sure everything is mixed well. Add salt to taste and serve.

Makes 6-8 servings.

Do you have any variations you use and love?? I’d enjoy hearing about them!

Fresh Friday 11/21/14

Hey everyone!

I’ve had so much going on lately! I’m sure you all are in the same boat. Such a busy time of the year.  We have a shake-up of staff at work so that’s been going on, prep for holidays, and a mother who had surgery at the start of the month. There has been a lot of highway driving to go to the hospital, rehab center, and her place to hang out or to get things prepped for her return home. We (well, really, the Huz) installed a stair-lift at mom’s place for her to get between the 1st and 2nd floors. That was a HUGE ordeal, but after 2 weeks, it’s all finally taken care of and installed. Mom is thrilled. I’m glad that she can be more independent in her home now.

Last night, the Huz and I went to see Interstellar at the IMAX. Oh man! It was beautiful! I want to go into so many details with you on here, but I hate spoilers, so I’ll just give you the highlight reviews. No spoilers.

I mean, everything was beautiful. The plot, the actors/characters, graphics, sound effects, music (Hans Zimmer…great job!), concepts. Just beautiful. They did an amazing job of getting me to relate to the characters and their plights. For the raw content review: no sexuality, not much language, some violence, some intense frightening situations. I would not take a little kid to see it. Apollo 13 was an emotional movie, but this was more intense on that regard. I got choked up and teary in several spots. If you’re worried about non-Biblical philosophies, there was no mention of religion, except for a sarcastic comment about prayer to an object. It was a pure science-fiction movie and one with no agenda besides getting people curious about space again and what could be out there. That was very refreshing.

I am not one of those people who thinks there could be life “out there” in space somewhere. I think the Earth is God’s unique creation. But the universe is so enormous and so diverse! All of it was created to give God glory and I think it does an amazing job of that. I have always had an explorer spirit so the idea of going to see something brand new would be incredible. I would not be able to survive in space though. Yipes! But I enjoy (most) movies that take me there instead.

One comment by Anne Hathaway’s character was so poignant and, I thought, almost a hint of the Gospel, but not quite there. She made a comment that love is something that could not be a survival instinct. Love for the dead especially, but that it must be a kind of artifact of a higher dimension. I whole-heartedly believe that the higher dimension is God. He put the capacity for love in our hearts and it is beautiful.  Anyway, I would highly recommend this film and if you can see it at an IMAX, it is well worth the price!!!

Before heading out for the movie, I had some time to make some cookies. Our local Kroger carries persimmons and I have been dying to find more things to do with persimmons. I found a few cookie recipes on Pinterest and tried of them out. Yum, this recipe is so good!!!

You’re welcome and enjoy!

Fresh Friday – Foodie Edition (8/1/14)

I’ve been lax in my blogging of late.  All I’ve been posting lately is the Bible Verse Calendar, which is great, but once a month posting is not a good habit for a blog. So, I thought that with the start of a new month, I would start a new habit. I’m calling it Fresh Friday. I was going to go with Foodie Friday, but then I thought, “What if I want to talk about flowers sometime and I want to have a Flower Friday?!” Well, I guess I could…Maybe I could switcharoo it every few weeks or so. Throw in a Fun Friday too, here and there. Hmm…. (This is a perfect insight to the conversation I’ve been having for the last, oh, 17 hours inside my head. You’re welcome.)

I think Fresh Friday would encapsulate all the things I could want to share on any given Friday. Anything that doesn’t fit in, I can just make up a whole new category and squeeze it in there. Right? Isn’t that what the internet is for? Making up things?! So, here we go. The first edition of Fresh Friday!

Fresh Friday – Foodie Edition

We had some friends over last weekend and the menu was a bit of a challenge because of food allergies and intolerances. But, hey, I have a bunch of those too, and mine are just random, so I “challenge accepted!” it and here’s what we came up with. The food turned out yummy. You know all those fears that really intensely healthy foods will probably be bland and dissatisfying (or maybe I’m still a decade behind)? There are a couple websites that are working to change that opinion and from my experience with them, it is working!

My sister turned me on to this site. She and her husband have been trying to eat Paleo for a while. They succeeded for a bit and then, well, you know, unhealthy eating happens sometimes. But the idea is that you remove all grains from your diet, all processed foods, and just go with meat, fruits, veggies and nuts. The basic concept is that our bodies weren’t designed for processed foods. Our bodies were designed to eat what we could grow and raise in our own yards. I, myself, would have a hard time getting grains out of my diet, but I think the primary issue seems to be that there are too many grains in our diet. We overdo them quite a bit. And the whole GMO grain bit, that can be a bit of a challenge, but there are some great products out there from farmers striving to use pure grains not tainted or “enhanced.” Here’s a great page to look at: Paleo 101. I’ll tell you, though, my sister looked amazing as she was going through this diet lifestyle change. Really amazing! It’s a whole reprogramming on your idea of food.

I have been perusing this blog a lot recently. Added it to my Bloglovin’ app feed too and enjoying the posts therein. Definitely recommend checking it out.

Allrecipes.com might be old news in the internet foodie world, but they still are my go-to place for great recipes! I usually find myself reading the other user comments for tweaks and adjustments that they have made. Also, the reviews bit is wonderful. Nothing like seeing what looks like it could be a great recipe (to this untrained eye) only to find out that 25 other people tried it and lost their pan and stirring spoon because of it. (That’s an inside story with my family…my other sister tried to make something and left out a crucial ingredient, turning the “something” into concrete and completely unsalvageable. It’s a testament to how important even the little ingredients can be, especially in baking!)

So, here are the recipes we came up with:

Creamy Cauliflower Garlic Rice – Pinch of Yum

Have you heard of pureed cauliflower as an alfredo sauce yet? I’ve had some friends try it and they loved it so I was willing to try this recipe out. The garlic went right along with the rest of our meal. I had to tweak the recipe a little for some needs, but I think that it you follow it to a T, it would be 10 times better! Also, we had a bunch left over, makes a great next day lunch.

Fried Okra – AllRecipes

Super yummy! I made this with olive oil and gluten-free cornmeal. Turned out really good. The first time I made it, the meal kept falling off. But it was my second time frying okra myself and I think it’ll be a regular appearance in this house. I think my next cajun attempt will be jambalaya or gumbo…with sausage and chicken. Oh yum!

And the main course!

Coconut-Buttermilk Southwestern Grilled Chicken – PaleoLeap

Ok, so it’s a very easy marinade and takes no time on the grill at all. So, so, sooooo good! So flavorful too! I let the marinade sit for a full day and the meat was so juicy and full of flavor. Very definitely recommend this recipe and the other marinades on this website. Also, if you try to pin this recipe, for some nutter reason, the link was reported for inappropriate content, so Pinterest won’t let it through. Instead save the website to your favorites and come back for regular visits.

Direct Links:

Creamy Cauliflower Garlic Rice – http://pinchofyum.com/creamy-cauliflower-garlic-rice

Fried Okra – http://allrecipes.com/Recipe/Fried-Okra/

Coconut-Buttermilk Southwestern Grilled Chicken – http://paleoleap.com/coconut-buttermilk-southwestern-grilled-chicken/

Enjoy!!

Smoky Weeknight Chili – BHG Recipe

I subscribed to the Better Homes & Gardens magazine. It brings me so much joy when it shows up in the mailbox each month. If you follow them elsewhere (Facebook, Instagram), then you’ll find even more inspiration. I thought that I would challenge myself this year with making one of the recipes that comes each month in the magazine. I…decided to do this starting last week, so I hadn’t made anything from the January or February editions. So, here you are, the Smoky Weeknight Chili, featured on page 101 of the BHG February edition. (I’m going to have to do something hunting for the January magazine…I can’t seem to find it anywhere…)

Now I’ve never made chili before. This looked like a fairly straightforward recipe, so I figured it would be a good one to start with. Plus, there is cocoa powder, and when you grow up in Cincinnati, you know that cocoa powder can make the chili. This recipe makes 4 servings of 1 1/2 cups each. I also added ground beef, because I cannot serve a meal to the Huz without meat…and I prefer meat in my chili as well.

Smoky Weeknight Chilichili 140307

Prep Time: 10 mins (unless you’re like me and prep while you cook)
Cook Time: 35 mins

Ingredients

1 tbsp vegetable oil
1 medium green sweet pepper, chopped (3/4 cup)
1 medium onion, chopped (1/2 cup)
1 15-16 oz can chickpeas (Garbanzo), rinsed and drained
1 15-16 oz can great Northern beans, rinsed and drained
2 tbsp chili powder (more or less for taste)
1 15 oz can tomato sauce
1 14 1/2 oz can fire-roasted diced tomatoes, undrained
*1 lb ground beef, browned and drained
1 tbsp packed brown sugar
1 tbsp dark unsweetened cocoa powder
*1 tsp cinnamon (optional for more of the Cincinnati variety)

Directions

1. In a large saucepan, heat the oil over medium-high heat. Add sweet pepper and onion. For great tip on how to cut bell peppers, which I did not do, click here. Cook and stir 4-5 minutes, or until tender. This took a bit longer for me, maybe 10 minutes. I think I had my heat turned down though.

2. Add beans and chili powder. Cook and stir 2 minutes.

3. Stir in tomato sauce, undrained tomatoes, ground beef, brown sugar, and cocoa powder and cinnamon, if desired. Bring to boiling and reduce heat. Cover and simmer 25 minutes, stirring occasionally.

4. Serving style: Optional toppings of sour cream, green onions, and chili powder. I shredded a bar of my Tillamook cheddar cheese and we used that as topping. It was so yummy!

Health details available (sans ground beef) at the original recipe link above. I revised the recipe format a little. They had steps 1-3 all compiled into one step, and that makes too much reading through while I’m cooking, so I separated it for you.

Hope you enjoy this recipe as much as I did! Have any chili recipes that YOU love? Care to share them?

Winter Recipes

There are a couple things I learned to love only when I had them while living abroad. One is a persimmon and another is daikon. I can’t abide red radishes. Never have been able to stomach them. I don’t know if the Japanese white radish is more mild, but it is definitely one of my favorite things. I snatched up a couple when I saw them on sale at my local Kroger (yowzas! how international!) and decided I need to do something with them.

Here’s the scoop on daikon.

The word daikon is Japanese for “Large root.” They look kind of like a big white carrot about 10-14 inches long. The flesh is crisp and juicy, with a mild, peppery flavor slightly hotter than a red radish, particularly near the bottom. Daikon is used raw, cooked and pickled. Peak season: Fall-winter, available year-round. Health highlights: Low in calories, fat and sodium. No cholesterol. Excellent source of vitamin C. contains enzymes such as diastase that may aid digestion. Goes with: Herbs, spices and flavors: cilantro, dry sherry, garlic, ginger, rice vinegar, scallions, sesame oil, soy sauce. Foods: Apples, beef, carrots, mushrooms, napa cabbage, onions, oranges, parsley, pork, rice, shellfish, snow peas. Info from “Fresh Produce Guide.”

We froze a lot of the leftover ham from Christmas, so I pulled out some of it and decided to make some soup!

Chunky Ham and Cheese Soup

Ingredients

IMG_20140104_1555562 cups water
2 cups peeled and diced potatoes (Idaho or russet)
1/2 cup diced carrots
1/2 cup diced daikon (or chopped celery)
1/4 chopped green onions
1 1/2 teaspoons salt
1/4 teaspoon black pepper
1 cup cooked ham, cubed
1/4 cup butter
1/4 cup all-purpose flour
2 cups milk
2 cups shredded Cheddar cheese

Directions

1. In a large saucepan, mix the water, potatoes, carrots, daikon, onions, salt and pepper. Bring to a boil. Reduce heat and simmer 30 minutes, or until vegetables are tender. You should probably leave the pan uncovered. I thought there might be a mistake, so I put the cover on it. When I was about to do step#4, I realized that my soup was going to be too watery, so I ladled some of it out. With the pan uncovered during this step, the water will evaporate out of the pan and leave you with the right amount of broth.

2. Mix the ham into the vegetable mixture. When I cubed the leftover ham, I included some of the bits of fat. It just adds the right kind of flavor to the broth while the vegetables are stewing, but you can prep it as you wish. I left the soup on the heat while I worked step #3.

IMG_20140111_144702_652_13. In a medium saucepan, melt the butter. Stir in the flour until smooth. Slowly pour in the milk. Bring to a boil. Cook and stir 2 minutes, or until thickened. stir in the Cheddar cheese until melted. This is the first time I’ve made a cheesey soup and I was amazed at how it turned out. Trust me, I would not have thought to add flour. The key is to watch it fairly constantly. You should work on this step once you have the veggies and ham done. I’ve been using Tillamook cheese recently and I love the flavor, consistency, and that it comes from cows not given artificial growth hormones. I have yet to cut myself while shredding it, so that’s always a plus.

4. Mix the cheese mixture with the rest of the soup and serve. Makes 8 servings.

This soup was a big hit with the Huz. We have some more ham leftover, so I might have to make another batch before the end of the month. We had a massive cold snap (like the rest of northern USA and Canada) and the soup warmed us right up!

Amish White Bread

Sometimes even the smell of bread baking in a house can warm up the place. During the -10*F weather we had earlier this week, that was just what I needed. I’ve become disenchanted with white bread bought in a store. I recently watched a video about this compound called azodicarbonamide. It’s a compound used to bleach flour in the US. It’s also found in foamed plastics…like yoga mats. Yum! It’s banned in Europe and Australia and has been thought to increase propensity for asthma.

Check it out in your favorite breads’ ingredient lists – even the ones that say whole wheat bread. The only ones I’ve found so far that don’t have this compound in it are potato bread and Nature’s Own butter buns. So I decided to make my own, take control of what we are putting in our bodies.

Ingredients – for 1 loaf

IMG_20131229_212511_007_21 cup warm water
1/3 cup white sugar
1 pack active dry yeast (2 1/4 tsp)
3/4 tsp salt
2 tbl vegatable oil
3 cups flour

Ingredients – for 2 loaves

2 cups warm water
2/3 white sugar
2 packs active dry yeast (4 1/2 tsp)
1/4 cup vegetable oil
1 1/2 tsp salt
6 cups flour

Directions

1. In a large bowl, dissolve sugar in warm water. Stir in the yeast. Depending on how old your yeast is, you might try to proof it first before mixing in the rest of the ingredients. Proofing is where you let the yeast foam up a bit, about 2 minutes. If it doesn’t, then the yeast might be too old. For fresh packets of yeast, go right ahead with the recipe. It’s best to use the yeast as quick as possible.

2. Mix salt and oil into yeast mixture. Add flour one cup at a time. I hand mix the flour at first and then use a dough hook with my mixer when it gets too hard to mix myself. Let the mixer go for a while, until the dough is balled up around the hook. It might still be a little sticky.

3. Knead dough on a lightly floured surface until smooth. Dough should be smooth and not sticky. Place in a well-oiled bowl, and turn dough to coat. Rub butter on the inside of a bowl that’s bigger than the doughball. Roll the dough around enough to coat the whole thing with butter. Cover the bowl with a damp cloth and set in a warm place to rise for one hour. The doughball should be twice its original side.

4. Punch dough down. Knead for a few minutes, divide in half (if making two loaves). Shape into loaves, please into a well-oiled 9×5 in loaf pan(s). Allow to rise for 30 mins or until 1 in above pans. I asked my mom if there was a a secret to getting the bread smooth on the top and she suggested using a rolling pin to roll out the dough, getting rid of all the air bubbles. Then, roll up the dough, one end to the other, tucking in the edges as you go. When you get to the end, press the seam into the rest of the dough and set it into the pan, seam-side down. Rub the top of the dough with butter.

5. Bake at 350*F for 30 minutes. I have a stoneware loaf pan and it makes the bread so nice and brown all around. And the bread never sticks to the pan, I would highly recommend using one.

Semi-DIY Decor and Pumpkin Spinach Soup

This has been a week! The Huz has been on the awful second shift at work, so I’ve had my evenings free. Evenings to get into some mischief. Mischief which includes decorating The House and making soup from scratch.

Yep. My kind of mischief.

I drove over to Pier 1 the other day because we had a $25 gift card for there AND they had a 10% off coupon on their website. I went to look for a thin shelf or a small table for the end of the hallway, but ended up leaving with some amazing curtains and a pillow to match.

131017 curtain pillow

Did you know that sometimes businesses will sell curtains one panel per pack???? I sure didn’t. Doesn’t seem logical.

The curtains I found ended up being one such pack. I figured that I could probably just order the other one online, but it turned out that I was accidentally more frugal than I thought and got a pattern that was on clearance. The closest one was about 2 hours away in Columbus, OH. I opted for the easy route.

We have pretty great blinds on our windows, so I was looking for the curtains for color and accent rather than usefulness. The single panel was wide enough that I could make two panels myself. Got out the scissors, sewing machine, and went to town.

131017 curtains

Oh, and that shelf I was talking about? Well, I grabbed a white one from Target (and that curtain rod) with some leftover gift cards from the wedding and spray painted it green. Nothing like a pop of color in an unexpected spot.

IMG_20131014_222131P.S. High Fives for awesome hubbies who will hang shelves and curtain rods on their mornings before they go to work. I love our teamwork.

————————————————-

And now for the soup!

A man at church was giving out bags of spinach from his garden. It looked soooo good. I couldn’t say no. We had picked up some sugar pumpkins at a nearby dairy farm and I have been aching for an excuse to hack into them. I found this recipe online and I’m only posting it as a reference to my starting point. I did things differently, but included most of the same ingredients. The original recipe is more for a creamy soup, since it calls for turning all the veggies into a puree. Also, I added chicken to mine, because I can’t get away with giving something without meat to the Huz.

Pumpkin Spinach Soup

Ingredients

2.5 lbs chicken breast, cubed (smaller pieces are better)
1 sweet onion
3 cups of cubed pumpkin (can be varied sizes, this is intensive) It took half a sugar pumpkin for me, probably great for leftover pieces from carving. remove skin.
4 cups raw spinach
1 32 oz box of broth (chicken or vegetable is fine. I used chicken)
2 cups water
1 tbsp butter
2 medium-sized tomatoes
2 cloves garlic
1 tbsp ginger
1 tbsp cinnamon
1 tsp turmeric
1/2 tsp coriander
1/4 tsp nutmeg
pinch of red pepper flakes
1 can of pumpkin puree
1 tbsp olive oil

Directions

Prep the pumpkin by removing the seeds and stringy innards and cutting apart the sides. As stated before, this is intensive and can take quite some time. There are easy ways to remove the skin by using wet paper towel and sticking them in the microwave. I was short on time, so, I just cut away, dicing as I went and then cutting the skin off at the last. (Fun side project: as you pull out the seeds, toss them into a colander and rinse. Be sure to get all the gunk off of them, then set aside between paper towels to dry – recommended dry time is one day. Toast later!)

131017 pumpkin

Dice the onion and garlic. Saute them in butter in a large pot on the stove over medium heat until the onion turns translucent.

IMG_20131016_210545_070

In a pan, cook the diced chicken until white on all sides. Set aside while the soup is prepped.

Once the onion is cooked, add the pumpkin, diced tomatoes, broth, water, pumpkin puree, chicken, and spices. I cut back one some of the spices because I wasn’t using as much liquid, but feel free to go at it. My end result was a very mellow flavoring, but pleasant. The Huz can’t handle stuff that’s too spicy.  (If you’re still cooking the chicken or cutting tomatoes, just add as you have it ready. This part is pretty flexible.) Add more water as needed to cover all the ingredients. Stir then cover the pot. Bring the mixture to a boil, then reduce to a simmer.

Cut up the spinach and toss into a pan to cook until it wilts. Check that the vegetables in the soup are tender. The pumpkin should have a potato-like consistency. In fact, the Huz thought they were potato until I told him it was pumpkin. Score! If the veggies are tender, stir the soup and add spinach.

131017 soup

I apologize for the lack of times in this recipe. I was given none, and since I spent a lot of time cutting my pumpkin while the soup was already going, I can’t remember how long it actually took me. All I know is that this soup has all the feel of gourmet.  If I could do it all over, I would have chopped up more chicken and chopped it up smaller (I did not use the above listed 2.5 lbs.) You can also do this without any meat, but you would probably need to add more pumpkin chunks to compensate.

Anyway, I discovered that potentially the best thing about cooking (soup in particular) is that you can take a recipe and make it your own. You can’t really do that with baking. I love my rules and parameters a lot, but I liked being free to improvise a bit with this recipe.

This batch made enough for me to freeze half of it in a gallon freezer bag and still have servings for myself and my husband for probably three nights. I know what I’m packing for lunch!

——————————————

Side Notes:

131017 sunflowers

So this is happening right now, in our front garden. Those suckers were all supposed to be less than 3 feet tall. 4 absolute max. I’ll be harvesting those seeds once they keel over completely. But right now, they’re just so pretty and as it’s getting so much colder, they make me very happy.

IMG_20131016_073913

This verse humbles me. I feel like I can keep a close watch over my mouth for the most part. I can get complainy like the rest of us, but the mouth seems to be fairly easy to keep tabs on. The heart, however, that’s a horse of a different color. Lord, help me to monitor what my heart dwells on. Out of the heart flows life and I want mine to be a life of praise and joy…not bitterness and discontent.

IMG_20131017_094223

Pardon the poor handwriting, but I found this fabulous piece in my box of Cinnamon Toast Crunch. It’s like they know me.

Have a great weekend!!


Recipe: Pumpkin and Cream Cheese Sandwich Cookies

What is happening to me?! I’m becoming a cooking/baking monster! I always loved baking though. And there’s nothing like baking something from scratch. It’s probably my favorite, when I have time for it. And I try to make time for it. With just me and the Huz, it’s not too hard to spend a couple hours in the kitchen, and the end result is normally satisfying.

I really recommend baking from scratch for two reasons – 1) You know exactly what is going into your food. You know because you put it there. No silly obscure scientific names, just the basics: flour, sugar, milk, egg, vanilla, pumpkin. Yum. And 2) the end result is no longer whatever the recipe says it is. It’s now part of you. Your heart (not literally) went into making that and THAT is fulfilling. I have yet to truly get there with cooking, but I’ve had some successes recently with new recipes, so that is encouraging me a lot.

I was about to finish up work yesterday with a growing need to making something pumpkinny. Did you know that you can’t always find pumpkin puree throughout the year? Reminds me of Japan with all the seasonal veggies/fruits. And that’s comforting to me. I enjoy using fresh pumpkin myself, but the process can be very messy and time-consuming. It has to be combined with roasting pumpkin seeds too. That’s just a given.

So, I wanted something sweet and something pumpkinny. I have a Pinterest board exclusively for pumpkin things. It’s delectable. I found the quickest pumpkin dessert recipe on there. The original recipe calls for all things gluten-free. I am not encumbered by the dietary restriction, so I did not use anything specifically GF. If you are, feel free to run over to that website for the alterations. This post, however, will include all the gluten-full and probably not-too-healthy-for-you ingredients necessary. Here you go!

Pumpkin and Cream Cheese Sandwich Cookies

IMG_20131004_230908

makes 24 individual cookies (12 sandwiches)

Prep:   30 mins      Total Time: 1:05

Ingredients:

Cookie

2 cups flour
1 tsp baking soda
1 tsp pumpkin pie spice**
1/2 tsp baking powder
1/2 tsp salt
1 cup packed brown sugar
1/2 cup butter softened (unsalted)
1/2 cup pumpkin (you can refrigerate the remaining pumpkin in the can for about a week)
1/4 cup milk
1 egg
1 tsp vanilla

Filling

8-oz package of cream cheese softened
2 tbs butter softened (unsalted)
1 tsp ground cinnamon
1 tsp vanilla
4 cups powdered sugar

extra powdered sugar

Directions

1. Preheat oven to 350*F

2. Combine dry ingredients (flour, baking soda, pumpkin pie spice, baking powder, salt) in medium bowl and set aside.

3. Combine brown sugar and 1/2 cup butter in large bowl and beat at medium-speed until creamy. Add pumpkin, milk, egg, and vanilla. Beat until well-mixed. It will not look very nice, but don’t worry. Add flour mixture and beat at low-speed until well-mixed. Now it looks like batter.

4. Drop batter onto ungreased cookie sheets with a spoon. I cover my cookies sheets with aluminum foil because I don’t like having to wash my cookie sheets. I’m lazy. I was liberal with the amounts (about a large half-dollar size) and they turned out pretty consistent. Not smooth like the ones on the original website, but they do the job. I had enough batter for 12 cookies each on 2 pans. Bake 9-10 minutes or until until set and lightly brown on the edges. I had to go a little longer to bake all the way through (since mine were thicker). Cool on cookie sheets for about 2 minutes then set on cooling rack. Cool completely.

IMG_20131004_230642

5. Combine all filling ingredients except for powdered sugar in a large mixing bowl. Beat at medium-speed until smooth. You’ll probably have to scrape the bowl a few times to get all the ingredients mixed in. Add powdered sugar to the mix, one cup at a time, mixing completely after each addition. This was my favorite part. Yum!

IMG_20131004_230814

6. Spread a layer of filling between the flat sides of two cookies and press together. You can be very liberal with this. We had a LOT of filling left over after I put a pretty good amount of filling between our cookies. We had so much, in fact, that we cut up a Honey Crisp apple and used half of it for dip and put the rest on the fridge for later use. So good. Sprinkle tops of sandwiches with extra powdered sugar (I forgot this part, but it does make them look cuter).

IMG_20131004_231017

7. This is up to you. Depending on when you are serving the cookies, it is best to pop them into the fridge for about 30 minutes so the filling will thicken a bit. If not, the cookies could slide off each other. We’ve made cookies that we called Gobs for years (chocolate cake cookies with super-rich cream cheese filling AND coated on outside) and this is how we set them up. You can just put them on a cookie sheet to cool, or, if you lack the space, wrap each sandwich in some Saran wrap and squeeze in wherever you can find a space. Makes it easy to pack into lunches for a treat, too, throughout the week. I sent one to work with the Huz so he could enjoy it later.

Go, my baking friends! Go and bake up some October!

————–
**You can also use 1/2 tsp ground cinnamon, 1/4 tsp ground ginger, 1/4 tsp ground nutmeg and 1/8 tsp ground cloves.


Recipe: Savory Autumn Scramble

While I was sitting at the car shop getting my oil changed, I perused through the Better Homes & Gardens magazine. There are usually some great recipes in there and the October issue did not disappoint. I quickly snapped pictures of each one and am determined to try them out throughout the season. The first attempt was the Savory Egg and Sweet Potato Scramble. The original recipe is here, but if you’re anything like me and my husband, you need a bit more meat to make a dinner meal. I decided to add some good ole Bob Evans sausage, because nothing is more Ohio than Bob Evans. Yum.

IMG_20130928_182558_640_1

Here’s the updated recipe:

Start to Finish: 35 mins

Ingredients:

8 eggs
1 lb package of sausage
1/3 cup milk
1/2 tsp cumin
1/4 tsp salt
1/4 tsp ground black pepper
1 tbsp butter
2 medium sweet potatoes, peeled, quartered lengthwise, and thinly sliced
2 green onions, sliced
2 cups baby spinach
bottled hot pepper sauce (optional)

Directions:

1.  Cook and crumble sausage in a skillet for 10-15 minutes until thoroughly cooked. Set aside.

2.  In a medium bowl whisk together eggs, milk, cumin, salt, and pepper. Set aside.

3.  Melt butter over medium heat in a large skillet. Toss in sweet potato and green onion. Cook, stirring occasionally, until potatoes are almost tender, about 8 minutes.  Add spinach. Cook until slightly wilted, about 1 minute.

It is amazing how big spinach is until it’s cooked for a while. Unreal!

4.  Mix sausage into the skillet. Pour egg mixture over potatoes. Let the egg cook and seep down to the bottom of the pan. At this point, I raised the heat to medium-high because the egg just wasn’t cooking fast enough. After the initial cook, begin mixing the cooked egg portion into the rest of the scramble, letting the uncooked part go to the bottom and cook. Continue this method until all egg is thoroughly cooked but still moist. This will take about 2-3 minutes. Remove from the heat and serve right away. Makes 4-5 servings. Add hot sauce if desired. This will reheat (like for lunch the next day) but I wouldn’t recommend more than three days.

And there you are. It was a pretty easy meal. We really liked it with the sausage added in. Hope you enjoy it as well!

Lately

There has been a lot going on of late. I would like to expound on each thing, but for now, I’ll just give you a quick overview.

I have started going to a chiropractor. I would venture that probably half of my church back home is going to this chiropractor. I went when I was a kid and Mom worked for one, but it has been a very long time. I had some discomfort in my left shoulder that gradually got more intense and into regular pain. So, I decided to hop on the bandwagon and check them out. I’m committed for a year (call me crazy!) and hopefully will see the good results my friends and church-family have been seeing. I’ll share more on this later, definitely. For now, you can just go check out their website.

Last Thursday (two Thursdays ago, I guess, since Sunday starts a new week), friends of mine gave offered us tickets to the Cincinnati Tennis event, ATP/WTA Western and Southern Open. I loooove professional tennis. It’s a lot of fun. Matt had never been to a game so that makes it even more fun for me. We were able to get tickets for Thursday night and watched Rafael Nadal play and then Serena Williams. They both won their matches. We even had box seats since the tickets were from someone who works with Rookwood Pottery – that’s an iconic Cincinnati pottery business and they make the trophies given out at the tournament. Very fun. This was our view for the evening:

tennis01 tennis02

Nadal had a wedgie the entire tournament and Matt commented on it every time he picked at it…well, maybe not every time. It felt like every time because he picked out his wedgie just about every play. I’m not a huge Nadal fan anyway, so it was annoying. But he’s one of the best in tennis history, so it’s still a good watch…unless he’s picking his wedgie. Dude, get some different undies.

Last Sunday, a man at Matt’s church was giving away from homegrown veggies. I grabbed up a zucchini and then sat around trying to figure out what to do with it. I also have some apples sitting around. Nice, plump, juicy apples. I got the big idea to add some apple to a zucchini bread. Sounds yummy, huh? Oh it was! But a word of warning – it might be a better idea to dry out the apple bits before adding them to your zucchini bread recipe. As it was, my recipe made either 24 muffins or 2 loaves of bread. I just have one pan for each, so I made 12 muffins and 1 loaf. Everything took probably twice as long to bake. I was up very late. I am wondering if the muffin recipe I have just makes really dense breads. I have yet to figure out how to make nice, fluffy breads. I’m guessing it is just something to learn. Regardless, they WERE very yummy! It’s almost all gone between Matt and I. Very dense. I would share the recipe with you, but I’m not really sure it worked the way it was supposed to. So, you can go to http://allrecipes.com and look up “apple zucchini” recipes. There are a bunch of things on there. I’m so glad.

muffins

Lastly, We were getting kind of low on our laundry detergent. I pinned more than a year ago this recipe for making your own. Claims to get 9 months of use out of $22+ of ingredients. That sounds fabulous! We haven’t had to buy detergent yet, so I thought it might be time to go ahead and make our own.

Here is the website with the original recipe:

It smelled so good while I was mixing it all together, and all the ingredients are supposed to be gentle for sensitive skin. I used it for my laundry last night and everything smells great! Only 1-2 tablespoons for each load. It’s just the two of us (as opposed to the blogger’s 5-member family) so I’m hoping it lasts us way longer than 9 months.

laundrysoap

Oh and all of our ingredients cost $22.10. Woot! Matt’s mother saw my pin and made this over a year ago. She has awful water to work with at their house and this is the only stuff that seems to work and actually get their clothes looking, feeling, smelling clean. When I posted pictures of the finished product, people came out of the woodwork on Facebook commenting about how they have been making their own and love it or asking questions about how to go about doing it themselves. As you can see, we have an HE washer, but it doesn’t seem to have any problem with the detergent. I put the date on some freezer tape and stuck it to the side of the box so I can see how long this batch lasts. I’m pretty pumped.

Have a great week everyone! Hopefully, I can check in with you before another week and a half rolls by.

Oh, and our sunflowers are kickin’ it!

sunflowers


Star Trek, Ants, and Painting

Well, we decided to go see Star Trek last Saturday for my birthday. Rather, I decided and Matt said, “Sure…it’s your birthday!” But he laughed during all the appropriate parts…sometimes during inappropriate parts too. Like, when one character is dying, and there is intense grieving on-screen, he turned to me and said, “Spock says, ‘Whaaaa??'” I did tell him that Vulcan’s don’t have much emotional expression, but I neglected to tell him how Spock is part human and therefore, capable of expressing emotions. Moot point. I shrugged it off and went back to my tears.

We stopped at Red Robin for dinner. My first time. *First times!* I got the Chili Chili Cheeseburger. Can you say yum?

IMG_20130615_200553

All that was left. It was so tempting that I forgot to take a before photo.

We got a box of gift cards to restaurants and such at one of the wedding showers, so my birthday date night only cost us about $10 max and that was leftover cost of meal and tip. Very nice afternoon/evening.

I’ve been trying to make this place more homey and together. It’s been hard because there are still boxes about that need to be unpacked. I can’t do that until I paint the bookshelves and start getting things on the walls. It’s a mess.

But I did manage to pull out the tablecloth and napkins and iron them out. I’m just saying, tablecloths are my least favorite thing to iron.

IMG_20130615_142338

Sure looks pretty, but I’m still not sold that it was worth the effort. Not to mention, it’s a round tablecloth! Ugh. Anyway, those are the flowers from the Huz. We’ve actually had two meals at the table now, since I put it together. That’s nice.

I’ve even been cooking. I had bought some various kinds of meat and thrown them in the freezer until we got around to doing something with them. I’ve been eyeing the tilapia that’s been in there for a while now, but I’ve never made fish before…besides fish sticks as a kid, and I have long since thrown those out of my diet. So, I went to good old Allrecipes.com and searched, “Easy tilapia.” No joke.

Here’s what I got:

Healthier Easy Baked Tilapia

and here’s what my version of it looked like:

IMG_20130620_185805

Ok, the fish IS in there, and it tasted yummy. I forego most things with lemon, and I went ahead and increased the amount of melted butter. It was pretty wonderful. There was so much seasoning on the fish, that I didn’t put much more than salt and pepper in the mashed potatoes…which I made from scratch. Go me! 🙂 You have no idea what an accomplishment this is for someone like me. I have never felt comfortable in a kitchen unless I was baking something, and then I’m right at home. Cooking is too ambiguous for me; there just aren’t enough rules. But I think I’ll keep trying at it. Matt certainly hopes that I will.

Speaking of kitchen, I walked into mine last night and found some tiny black ants crawling on one of the counters. Just in one little spot. You could tell they were just starting to explore. Ugh. I pulled everything off that section – they weren’t in anything yet, so it was a good catch. I stopped by Home Depot after work today and picked up some bait things and some spray.

IMG_20130622_161031

They caught on pretty quick. I went down for a nap and when I woke up 30 mins later, they were all over the trap. And then taking it home to their queen….to MURDER her! muahahaa! I let them go back and forth between the bait and their lair for a few hours and then sprayed the perimeter. The stuff must be pretty potent because there is little to no movement in that corridor now. Maybe I’ll leave the carcasses for Huz to clean up. 🙂 That sounds great!

I mentioned that I have some bookshelves to paint before I can really start putting the house together. Well, here’s one!

IMG_20130622_175208

This used to be my dad’s…way back in his college days. I didn’t know that until a week or so ago. This isn’t its finished state. I am just getting started. But i think it’s going to be good. It’s a short one and then I have its two big brothers to paint after it. Wish me luck! I love painting. 🙂

—————–

Garden Update:

Not much to report, except that I was weeding the other day and came across these!

IMG_20130616_145726

Yipes! Those things were huge! I don’t know what I’m going to do with this garden bed. There’s no telling what will come out of it. Ugh. Good news, though, my Impatiens are doing beautifully and starting to really fill in! Yay! Off to finish painting!